Category Archives: Instructions

battery tender plus instruction manual

Deltran’s Battery Tender Plus is a versatile, fully automatic charger designed for 12V lead-acid, AGM, and gel batteries.

This instruction manual guides users through safe and effective operation, ensuring optimal battery health and longevity for various applications.

What is a Battery Tender Plus?

The Battery Tender Plus is a sophisticated, multi-stage charger created by Deltran, designed to maintain and extend the life of lead-acid, AGM, and gel batteries. Unlike traditional chargers, it intelligently switches between charging modes – bulk, absorption, and float – to prevent overcharging and sulfation.

This instruction manual will detail how it automatically detects battery voltage and adjusts its charging process accordingly, making it ideal for seasonal vehicles, motorcycles, boats, and more. It’s a reliable solution for keeping batteries topped off and ready to use.

Benefits of Using a Battery Tender Plus

Employing a Battery Tender Plus, as detailed in this instruction manual, offers numerous advantages. It prevents battery degradation during storage, eliminating the need for jump-starts and extending battery lifespan. The automatic charging cycles ensure batteries are always fully charged and ready for use, providing peace of mind.

Furthermore, it combats sulfation, a common cause of battery failure, and maintains optimal voltage levels. This charger is a cost-effective solution for preserving battery investments and ensuring reliable power when needed.

Understanding the Components

This instruction manual details the Battery Tender Plus’s key parts: the charger unit, various cable and connector types, and informative LED indicator lights.

Charger Unit Overview

As per the instruction manual, the Battery Tender Plus charger unit is a robust, weatherproof device designed for reliable performance. It features a compact enclosure housing the charging circuitry and status indicators. The unit’s construction prioritizes durability, ensuring longevity even in challenging environments.

It includes connection points for the DC output cable to the battery and the AC input cable for power. Understanding these physical aspects, detailed in the manual, is crucial for proper setup and operation.

Cable and Connector Types

The instruction manual details two primary cable types: the DC output cable connecting to the battery terminals, and the AC input cable for mains power. The DC cable typically features a ring terminal for secure attachment.

Connector types vary based on regional power standards. Proper cable selection and secure connections are vital, as outlined in the manual, to prevent power loss and ensure safe, efficient charging. Inspect cables regularly for damage.

LED Indicator Lights – A Comprehensive Guide

The Battery Tender Plus instruction manual provides a detailed explanation of the LED indicators. A solid green light signifies a fully charged battery in maintenance mode.

A flashing red light indicates a potential issue, such as reverse polarity or a deeply discharged battery. The manual clarifies specific error codes displayed via flashing patterns, aiding troubleshooting. Understanding these signals is crucial for optimal charger performance and battery health;

Setting Up Your Battery Tender Plus

The instruction manual emphasizes a pre-use inspection of cables and connectors. Proper connection to the battery terminals – positive to positive, negative to negative – is vital.

Initial Inspection Before Use

Before each use, the instruction manual stresses a thorough inspection of the Battery Tender Plus. Carefully examine the AC power cord for any cracks or damage to the insulation.

Inspect the DC cables and connectors for corrosion, fraying, or loose connections. Ensure the alligator clips are clean and securely attached. A visual check confirms the charger unit itself hasn’t sustained any physical damage during storage or transport.

Addressing these issues proactively ensures safe and efficient charging, preventing potential hazards and maximizing the charger’s lifespan.

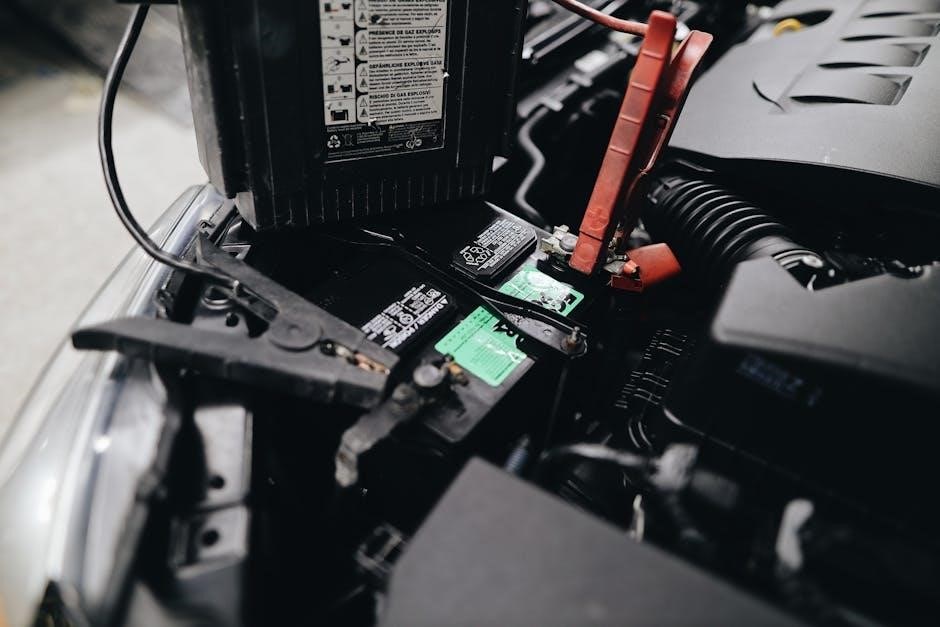
Connecting to the Battery – Positive and Negative Terminals

The instruction manual emphasizes correct polarity when connecting the Battery Tender Plus. First, disconnect the battery from the vehicle or device. Attach the red (+) clip to the positive terminal of the battery, and the black (-) clip to the negative terminal.

Double-check the connections to avoid sparks or damage. Ensure clips have a secure grip. A reverse connection can damage the charger and the battery, voiding the warranty.

Always connect to the battery before plugging into AC power.

AC Power Connection and Voltage Requirements

The instruction manual states the Battery Tender Plus is designed for standard 120V AC outlets. Verify your outlet voltage matches the charger’s requirements before plugging in. Do not use adapters or extension cords unless absolutely necessary, and ensure they are appropriately rated for the charger’s amperage;

Avoid connecting to outlets with damaged wiring or overloaded circuits. The charger automatically switches between 50/60Hz, making it suitable for international use with a proper plug adapter.

Charging Modes Explained

The instruction manual details three modes: Standard, Float, and Boost. Standard charges, Float maintains, and Boost recovers deeply discharged batteries efficiently.

Standard Charging Mode

As per the instruction manual, Standard Charging Mode is the initial phase for most batteries. It delivers a controlled current to replenish the battery’s charge, gradually increasing voltage. The Battery Tender Plus automatically adjusts the current based on the battery’s condition and capacity. This mode continues until the battery reaches full charge, indicated by a change in the LED status. It’s ideal for routinely charging batteries that haven’t been deeply discharged, providing a safe and effective charging cycle.

Float Charging Mode – Maintaining Battery Health

The instruction manual details Float Charging Mode as a crucial long-term maintenance stage. Once the battery is fully charged, the Tender Plus switches to this mode, providing a low, continuous current. This compensates for self-discharge, keeping the battery at 100% readiness without overcharging. Float mode significantly extends battery life, especially during periods of storage or infrequent use, ensuring optimal performance when needed. It’s a key feature for seasonal vehicles and equipment.

Boost Charging Mode – For Deeply Discharged Batteries

The Battery Tender Plus instruction manual explains Boost Charging Mode is designed to recover severely discharged batteries – those below 3 volts; This mode delivers a higher current initially, attempting to gently revive the battery. However, the manual cautions that deeply discharged batteries may have suffered permanent damage and might not fully recover. It’s a recovery attempt, not a guaranteed solution, and monitoring is advised.

Troubleshooting Common Issues

The Battery Tender Plus instruction manual details solutions for problems like no power, unrecognized batteries, and LED error codes, ensuring proper charger function.

No Power to the Charger

According to the Battery Tender Plus instruction manual, if the charger lacks power, first verify a functioning AC outlet. Ensure the power cord is securely connected to both the charger and the wall.

Check the fuse within the charger’s plug; a blown fuse will prevent operation. If the fuse is intact and the outlet works, the charger itself may be faulty, requiring professional service or replacement. Always disconnect the charger before inspecting the fuse.

Charger Not Recognizing the Battery

The Battery Tender Plus instruction manual details troubleshooting for battery recognition issues. First, confirm correct polarity – red clamp to positive (+), black to negative (-). A deeply discharged battery (below 3V) may not be recognized; attempt a ‘Boost’ charge if available.

Inspect the battery terminals for corrosion or debris, hindering a good connection. Ensure the alligator clips are firmly attached to clean metal surfaces. A damaged battery may also cause this issue.

LED Indicators Showing Error Codes

The Battery Tender Plus instruction manual explains LED error codes. A flashing red light often indicates a problem – reverse polarity, a short circuit, or a severely damaged battery. Consult the manual’s troubleshooting section for specific code meanings.

Ensure proper connections and a good battery state; If errors persist, disconnect the charger and inspect cables for damage. Contact Deltran support if the issue remains unresolved, referencing the specific error code.

Safety Precautions

The Battery Tender Plus instruction manual stresses avoiding sparks, short circuits, and ensuring proper ventilation during charging for safe operation.

Avoiding Sparks and Short Circuits

The Battery Tender Plus instruction manual emphatically warns against creating sparks when connecting or disconnecting the charger. Always connect the positive (+) clamp first, followed by the negative (-) clamp, and disconnect in the reverse order.

Avoid allowing the clamps to touch each other or any metal object, as this can cause a dangerous short circuit. Inspect cables for damage before each use; frayed or cracked cables pose a significant safety risk. Ensure the charger is disconnected from AC power during cable connections;

Proper Ventilation During Charging

The Battery Tender Plus instruction manual stresses the importance of charging batteries in a well-ventilated area. Lead-acid batteries release explosive hydrogen gas during charging, necessitating adequate airflow to prevent gas accumulation.

Do not enclose the charger in a confined space, and avoid charging near open flames or other ignition sources. Ensure sufficient space around the charger for air circulation. This precaution minimizes the risk of fire or explosion, ensuring a safe charging environment.

Temperature Considerations

The Battery Tender Plus instruction manual advises against charging batteries in extreme temperatures. Ideal charging temperatures range between 32°F (0°C) and 104°F (40°C).

Avoid charging in direct sunlight or near heat sources. Extremely cold temperatures can reduce battery capacity, while high temperatures can damage the battery and charger. Charging should not occur if the temperature falls outside the recommended range, ensuring optimal performance and safety.

Battery Compatibility

The Battery Tender Plus instruction manual details compatibility with 6V and 12V lead-acid, AGM, and gel batteries, offering versatile charging solutions.

Supported Battery Types (Lead-Acid, AGM, Gel)

The Battery Tender Plus instruction manual explicitly states support for several battery chemistries. Traditional flooded lead-acid batteries are fully compatible, alongside Absorbed Glass Mat (AGM) batteries, commonly found in motorcycles and powersports.

Gel batteries, requiring a slightly different charging profile, are also supported. The manual emphasizes selecting the correct voltage setting (6V or 12V) based on the battery type to prevent damage and ensure optimal charging performance and longevity.

Voltage Settings (6V, 12V)

The Battery Tender Plus instruction manual details the importance of correct voltage selection. Users must choose between 6V and 12V settings before connecting to the battery. Incorrect voltage can severely damage the battery or the charger itself.

The manual clearly illustrates how to switch between these settings, often via a physical switch on the unit. Confirming the correct voltage is crucial for optimal charging and preventing potential hazards, as outlined in the safety precautions section.

Battery Capacity Considerations

The Battery Tender Plus instruction manual emphasizes that while the charger is versatile, battery capacity impacts charging time. Larger capacity batteries (measured in Amp-hours ⏤ Ah) require longer charging cycles.

The manual doesn’t have a strict capacity limit, but advises monitoring the charging process. Deeply discharged batteries, regardless of capacity, may benefit from the ‘Boost’ mode initially. Understanding your battery’s Ah rating ensures efficient and safe charging, maximizing its lifespan.

Maintenance and Care

The Battery Tender Plus instruction manual recommends regular cleaning of the unit and cable inspection for damage. Proper storage, when not in use, extends its life.

Cleaning the Charger Unit

According to the Battery Tender Plus instruction manual, disconnect the charger from both AC power and the battery before any cleaning attempts. Use a damp cloth to wipe the exterior casing, removing any dust or debris that may accumulate during use.

Avoid using harsh chemicals, solvents, or abrasive cleaners, as these can damage the unit’s plastic components. Ensure the charger is completely dry before reconnecting it to power or a battery. Regular cleaning helps maintain optimal performance and extends the charger’s lifespan.

Cable Inspection and Replacement

The Battery Tender Plus instruction manual stresses regular cable inspection for cracks, fraying, or corrosion. Damaged cables pose a safety risk and can hinder charging efficiency. If any damage is detected, immediately discontinue use.

Replacement cables should match the original gauge and connector type, available through Deltran or authorized retailers. Always disconnect the charger from power before replacing cables, ensuring a safe and proper installation for continued reliable operation.

Storage Guidelines

The Battery Tender Plus instruction manual recommends storing the charger in a cool, dry environment when not in use. Avoid exposure to extreme temperatures or humidity, which can damage internal components.

Coil the cables loosely and secure them with a cable tie to prevent tangling. Before long-term storage, ensure the charger is disconnected from both the battery and AC power. Proper storage extends the charger’s lifespan and ensures readiness when needed.

Advanced Features

Battery Tender Plus boasts automatic voltage detection, reverse polarity protection, and short circuit protection, enhancing safety and usability as detailed in the instruction manual.

Automatic Voltage Detection

The Battery Tender Plus intelligently detects the battery’s voltage – 6V or 12V – automatically, as explained in the instruction manual. This eliminates the need for manual selection, simplifying the charging process.

The charger assesses the voltage upon connection and adjusts its output accordingly, ensuring compatibility and preventing damage. This feature is crucial for users with multiple battery types, offering a convenient and foolproof charging solution. Always refer to the manual for specific details and optimal usage.

Reverse Polarity Protection

The Battery Tender Plus incorporates robust reverse polarity protection, a key safety feature detailed in the instruction manual. If the charger is accidentally connected with the positive and negative terminals reversed, it will not charge the battery and will indicate an error.

This prevents potential damage to both the charger and the battery, safeguarding against sparks or short circuits. However, the manual stresses immediately disconnecting the charger if reverse polarity is detected to avoid any prolonged risk.

Short Circuit Protection

The Battery Tender Plus instruction manual emphasizes its built-in short circuit protection. Should a short circuit occur within the battery or charging cables, the charger is designed to automatically shut down, preventing damage and potential hazards.

This safety mechanism, crucial for unattended charging, safeguards against overheating and fire risks. The manual advises inspecting cables regularly for damage and disconnecting the charger before investigating any suspected short circuits.

User Manual Resources

The official Deltran user manual, available online, provides comprehensive guidance. FAQs and support are readily accessible for troubleshooting and optimal Battery Tender Plus use.

Locating the Official Deltran User Manual

Accessing the official Deltran Battery Tender Plus user manual is crucial for understanding all features and safety precautions. You can typically find the most up-to-date version directly on the Deltran website (deltran.com).

Search for your specific model number to ensure you download the correct documentation. The manual details charging modes, troubleshooting steps, and warranty information. A PDF version is often available for easy download and offline viewing, providing a valuable resource for all users.

Online Support and FAQs

Deltran provides extensive online support to assist users with their Battery Tender Plus chargers. Their website features a comprehensive FAQ section addressing common questions regarding operation, troubleshooting, and compatibility.

You can also find helpful videos demonstrating proper setup and usage. For more personalized assistance, Deltran offers customer support via email or phone, ensuring you receive expert guidance when navigating the instruction manual or resolving any issues.

Warranty Information

Deltran Battery Tender Plus chargers are covered by a warranty against defects in materials and workmanship.

Refer to the instruction manual for specific terms, duration, and procedures for claiming warranty service.

Deltran Battery Tender Plus Warranty Details

Deltran offers a limited warranty on the Battery Tender Plus, typically covering defects in materials and workmanship for a period of one year from the date of purchase.

This warranty, detailed in the instruction manual, doesn’t cover damage from misuse, accidents, unauthorized modifications, or normal wear and tear. Proof of purchase is required for all warranty claims.

Deltran’s responsibility is limited to repair or replacement of the defective unit, at their discretion. Shipping costs for returns are the responsibility of the customer.

Contacting Deltran Customer Support

For assistance with your Battery Tender Plus, refer to the comprehensive troubleshooting section within the instruction manual first.

If further support is needed, Deltran provides customer service via phone and email. Contact information is readily available on their official website, Deltran.com.

When contacting support, have your model number and date of purchase ready to expedite the process. Online FAQs and resources are also available for quick answers to common questions.

prose pre shampoo scalp mask instructions

Prose Pre-Shampoo Scalp Masks: A Comprehensive Guide

Prose pre-shampoo masks deeply nourish‚ preparing hair for cleansing; they function similarly to hair oils‚ leaving strands remarkably silky.

These masks are applied before shampooing‚ providing essential hydration and addressing specific scalp concerns for optimal hair health.

They represent a crucial step in a holistic hair care regimen‚ enhancing the effectiveness of subsequent treatments.

Consider Prose masks as a foundational element for a healthier‚ more vibrant scalp and ultimately‚ beautiful hair.

What is a Prose Pre-Shampoo Scalp Mask?

Prose pre-shampoo scalp masks represent a revolutionary approach to hair care‚ moving beyond traditional shampooing to prioritize scalp health. Unlike conventional conditioners focused on the hair shaft‚ these masks are specifically formulated to address the needs of the scalp before cleansing. They are designed to deeply nourish‚ hydrate‚ and balance the scalp’s microbiome‚ creating an optimal environment for healthy hair growth.

Essentially‚ a Prose pre-shampoo mask acts as a protective barrier‚ shielding the scalp and hair from the potentially stripping effects of shampoo. Think of it as priming your scalp for a thorough‚ yet gentle‚ cleanse. These masks are not simply about superficial hydration; they delve deeper‚ targeting specific concerns like dryness‚ oiliness‚ sensitivity‚ or flakiness.

The formulation of a Prose mask is highly personalized‚ based on an in-depth hair and scalp quiz. This ensures that the ingredients are tailored to your unique needs‚ maximizing effectiveness. They function similarly to hair oils‚ imparting silkiness and manageability‚ but with a more targeted and comprehensive approach. Applying a mask before shampooing allows for better absorption of beneficial ingredients‚ leading to long-term scalp and hair health improvements.

Benefits of Using a Pre-Shampoo Scalp Mask

Employing a Prose pre-shampoo scalp mask delivers a multitude of benefits‚ extending far beyond simply cleaner hair. Primarily‚ these masks provide intense hydration‚ combating dryness and flakiness at the root. This is crucial as a healthy scalp is the foundation for healthy hair growth. By nourishing the scalp‚ masks help to balance oil production‚ addressing both excessive oiliness and dryness.

Furthermore‚ pre-shampoo masks create a protective barrier‚ shielding hair from the harsh stripping effects of sulfates and other cleansing agents found in many shampoos. This minimizes damage‚ preserves natural oils‚ and enhances color retention. They also improve hair manageability‚ leaving strands silkier‚ softer‚ and easier to detangle.

Prose masks can soothe sensitive scalps‚ reducing irritation and inflammation. Personalized formulations target specific concerns‚ like dandruff or itchiness‚ providing relief and promoting a healthier scalp environment. Ultimately‚ consistent use leads to stronger‚ more resilient hair‚ reduced breakage‚ and a noticeable improvement in overall hair health and vitality. They truly elevate your hair care routine.

Understanding Your Scalp Type

Identifying your scalp type is paramount when selecting the optimal Prose pre-shampoo mask. Scalp types‚ much like skin types‚ fall into several categories: normal‚ dry‚ oily‚ combination‚ and sensitive. A normal scalp enjoys balanced hydration and oil production‚ rarely experiencing issues. Dry scalps feel tight‚ itchy‚ and may exhibit flaking‚ requiring intense moisture.

Oily scalps‚ conversely‚ produce excess sebum‚ leading to a greasy feel and potential for clogged pores. Combination scalps present a mix of oily and dry areas‚ often with an oily T-zone and drier ends. Sensitive scalps are easily irritated‚ reacting to products with redness‚ itching‚ or burning sensations.

Determining your scalp type involves observation. How does your scalp feel several hours after washing? Is there visible flaking or oiliness? Does your scalp react to certain products? Prose offers a personalized quiz to assist in this assessment‚ ensuring you receive a mask tailored to your unique needs. Understanding your scalp is the first step towards targeted care and optimal results.

Identifying Common Scalp Concerns

Many individuals experience specific scalp concerns that a Prose pre-shampoo mask can address. Dandruff‚ characterized by flaky‚ itchy skin‚ is a prevalent issue often caused by a yeast-like fungus. Dry scalp‚ frequently mistaken for dandruff‚ lacks moisture and presents as tight‚ uncomfortable skin. Itchiness‚ regardless of the cause‚ can be incredibly disruptive and may indicate sensitivity or irritation.

Scalp sensitivity is a common concern‚ with reactions triggered by ingredients or environmental factors. Product buildup‚ from styling agents and shampoos‚ can clog pores and weigh hair down. An imbalanced scalp microbiome can contribute to inflammation and various issues. Furthermore‚ some experience scalp dryness leading to breakage.

Prose masks are formulated to target these concerns. Ingredients like salicylic acid can exfoliate and combat dandruff‚ while hydrating agents soothe dry‚ itchy scalps. Identifying your specific concern allows you to select a mask with the appropriate ingredients for effective relief and a healthier scalp environment.

Prose Scalp Mask Ingredients & Their Functions

Prose pre-shampoo masks utilize a diverse range of ingredients‚ each serving a specific function to optimize scalp health. Salicylic acid‚ a beta hydroxy acid (BHA)‚ gently exfoliates‚ removing dead skin cells and unclogging pores – ideal for dandruff and buildup. Hyaluronic acid is a potent humectant‚ drawing moisture into the scalp to combat dryness and promote hydration.

Aloe vera offers soothing and anti-inflammatory properties‚ calming irritated scalps and reducing redness. Tea tree oil‚ known for its antimicrobial benefits‚ helps address fungal issues and maintain a balanced scalp microbiome. Ceramides strengthen the scalp’s natural barrier‚ preventing moisture loss and protecting against environmental stressors.

Additionally‚ various botanical extracts‚ like rosemary and chamomile‚ provide antioxidant protection and promote circulation. Prose carefully selects ingredients based on your scalp profile‚ ensuring a customized formula that effectively targets your unique needs. These ingredients work synergistically to nourish‚ balance‚ and revitalize the scalp.

How to Choose the Right Prose Mask for Your Scalp

Selecting the ideal Prose pre-shampoo mask begins with understanding your scalp’s unique needs. Prose offers a personalized approach‚ initiating with a detailed online consultation. This assessment analyzes your scalp type – oily‚ dry‚ normal‚ or combination – and identifies specific concerns like dandruff‚ sensitivity‚ or buildup.

Based on your responses‚ Prose formulates a custom mask with targeted ingredients. For oily scalps‚ look for masks containing salicylic acid or tea tree oil to regulate sebum production. Dry scalps benefit from hydrating ingredients like hyaluronic acid and aloe vera. Sensitive scalps require gentle formulas with soothing botanicals like chamomile.

Consider your hair type as well; fine hair may prefer lighter formulations‚ while thicker hair can handle richer masks; Review the ingredient list to ensure compatibility with any allergies or sensitivities. Prose provides clear descriptions of each mask’s benefits‚ aiding informed decision-making.

Step-by-Step Application Instructions

Begin with dry hair. Part your hair into four sections for even distribution. Using the applicator tip‚ directly apply the Prose pre-shampoo mask to your scalp‚ focusing on the roots. Gently massage the mask into your scalp using circular motions for approximately 2-3 minutes. This stimulates circulation and ensures thorough coverage.

Work through each section‚ ensuring the entire scalp is coated. Avoid applying the mask directly to the lengths of your hair‚ as it’s designed for scalp treatment. Once applied‚ secure each section with a clip to prevent mixing.

For optimal absorption‚ gently massage your scalp again for another minute. This enhances ingredient penetration. Ensure all areas of the scalp are covered‚ paying attention to the hairline and nape of the neck. A thorough application maximizes the mask’s effectiveness.

Application Timing & Duration

The ideal timing for applying your Prose pre-shampoo scalp mask is before your regular shampoo routine‚ typically on wash day. Integrate it seamlessly into your existing hair care schedule. For best results‚ apply the mask to dry hair‚ as this allows for optimal absorption of the nourishing ingredients directly onto the scalp.

Regarding duration‚ leave the mask on for a minimum of 10-20 minutes. This allows sufficient time for the active ingredients to penetrate and work their magic. For a more intensive treatment‚ you can extend the duration up to 30 minutes.

Consider wrapping your hair in a warm towel or shower cap during the processing time; this creates a gentle heat‚ further enhancing absorption. Avoid leaving the mask on overnight‚ as prolonged exposure may not yield additional benefits and could potentially cause buildup.

Rinsing Techniques for Optimal Results

Proper rinsing is crucial to maximize the benefits of your Prose pre-shampoo scalp mask and prevent any residue buildup. Begin with lukewarm water‚ avoiding excessively hot temperatures which can strip the scalp of its natural oils. Gently massage your scalp while rinsing‚ ensuring all traces of the mask are thoroughly removed.

Focus on the roots and scalp area‚ as this is where the mask has been most concentrated. Avoid harsh scrubbing‚ opting instead for a gentle‚ circular motion; Continue rinsing until the water runs completely clear‚ indicating that all product has been eliminated.

Follow up with your regular shampoo and conditioner routine. A double cleanse may be beneficial to ensure complete removal‚ particularly if you have fine or easily weighed-down hair.

Finally‚ a cool water rinse at the end can help seal the hair cuticle‚ promoting shine and smoothness.

Frequency of Use

Determining the ideal frequency of Prose pre-shampoo scalp mask application depends largely on your individual scalp type and concerns. For those with very dry or damaged scalps‚ incorporating a mask 1-2 times per week can provide significant relief and hydration.

Individuals with oily scalps may benefit from using a mask less frequently‚ perhaps once every two weeks‚ to avoid over-saturation. Normal scalps generally respond well to weekly applications. Pay close attention to how your scalp feels after each use and adjust accordingly.

Overuse can potentially lead to buildup‚ so it’s essential to find a balance that works for you.

Consider alternating with other scalp treatments or simply maintaining your regular hair care routine on weeks when a mask isn’t necessary. Consistency is key‚ but listening to your scalp’s needs is paramount for optimal results.

Combining with Other Scalp Treatments

Prose pre-shampoo scalp masks can be seamlessly integrated into a comprehensive scalp care routine alongside other treatments‚ but strategic layering is crucial. Avoid combining the mask with harsh chemical exfoliants or intense clarifying shampoos immediately before or after application‚ as this could cause irritation.

However‚ pairing the mask with gentle scalp serums containing ingredients like niacinamide or peptides after rinsing can amplify their benefits‚ promoting circulation and strengthening the scalp barrier.

If you utilize leave-in scalp treatments‚ apply them after the mask has been thoroughly rinsed and your hair is partially dried.

Remember to always introduce new combinations gradually‚ observing your scalp’s reaction to each addition. Prioritize gentle‚ nourishing pairings to maximize the mask’s hydrating and soothing effects‚ creating a synergistic approach to scalp health.

Potential Side Effects & Precautions

While Prose pre-shampoo scalp masks are formulated with generally gentle ingredients‚ potential side effects can occur‚ particularly with sensitive scalps. Mild itching or tingling is common during the initial applications‚ indicating increased circulation‚ and usually subsides quickly.

However‚ discontinue use if you experience persistent redness‚ burning‚ or significant irritation. Always perform a patch test on a small area of skin 48 hours before full application to check for allergic reactions.

Individuals with known allergies to any of the listed ingredients should avoid using the mask. If you have open wounds or severe inflammation on your scalp‚ postpone application until fully healed.

Avoid contact with eyes; if contact occurs‚ rinse thoroughly with water. It’s also advisable to consult a dermatologist if you have underlying scalp conditions before incorporating the mask into your routine‚ ensuring compatibility and optimal results.

Prose Mask vs. Traditional Hair Oils

Both Prose pre-shampoo masks and traditional hair oils aim to nourish and protect hair before cleansing‚ but they differ in formulation and delivery. Hair oils‚ like coconut or argan oil‚ are typically single-ingredient emollients‚ providing surface-level hydration and shine.

Prose masks‚ however‚ are custom-blended with a wider range of ingredients – including oils‚ but also humectants‚ proteins‚ and vitamins – targeting specific scalp and hair concerns. This allows for a more personalized and intensive treatment.

Masks offer deeper penetration and address issues like dryness‚ flakiness‚ or oiliness at the root‚ while oils primarily coat the hair shaft. The mask’s thicker consistency also aids in better product retention during application.

Furthermore‚ Prose masks are designed to be washed out before shampooing‚ ensuring a clean slate‚ whereas some oils may require multiple washes to remove completely. Ultimately‚ masks provide a more comprehensive pre-shampoo ritual.

DIY Alternatives to Prose Masks

While Prose offers customized formulations‚ effective DIY pre-shampoo masks are achievable using readily available ingredients. For dry scalps‚ combine mashed avocado with honey and olive oil for deep hydration. This mixture provides essential fatty acids and humectants.

Oily scalps benefit from a blend of lemon juice‚ apple cider vinegar‚ and aloe vera‚ helping to balance oil production and clarify the scalp. A yogurt and honey mask can soothe irritation and provide gentle exfoliation.

To create a protein-rich treatment‚ mix egg yolk with olive oil and honey‚ strengthening hair strands. Remember to rinse thoroughly with cool water to prevent cooking the egg!

These DIY options‚ while effective‚ lack the personalized ingredient selection of Prose. However‚ they offer a cost-effective way to incorporate pre-shampoo care into your routine. Always patch-test before full application to check for sensitivities.

Customer Reviews & Testimonials

Prose pre-shampoo scalp masks consistently receive positive feedback‚ with users reporting significant improvements in scalp health and hair texture. Many highlight the personalized formulation as a key benefit‚ addressing specific concerns like dryness‚ oiliness‚ and sensitivity.

Customers praise the masks for reducing itchiness‚ flakiness‚ and irritation‚ leading to a more comfortable scalp environment. Several testimonials mention increased hair manageability‚ reduced breakage‚ and enhanced shine after incorporating the masks into their routines.

Users with color-treated hair appreciate the gentle formulas that don’t strip color. Others note a noticeable difference in hair volume and overall health; Some reviewers suggest pairing the mask with Prose’s customized shampoo and conditioner for optimal results.

While overwhelmingly positive‚ a few users with extremely sensitive scalps recommend patch-testing due to potential ingredient sensitivities. Overall‚ the consensus is that Prose pre-shampoo masks are a worthwhile investment for a healthier scalp and happier hair.

Where to Purchase Prose Scalp Masks

Prose pre-shampoo scalp masks are primarily available for purchase directly through the official Prose website: www.prose.com. This direct-to-consumer model allows for the personalized formulation process‚ crucial to the brand’s approach.

The purchasing journey begins with a detailed online hair quiz‚ assessing scalp health‚ hair type‚ and concerns. Based on the results‚ Prose creates a customized mask tailored to individual needs. Subscription options are available‚ offering convenient recurring deliveries.

Currently‚ Prose does not offer its products in traditional brick-and-mortar retail stores. This focused online distribution ensures product freshness and maintains control over the personalized experience.

Occasionally‚ Prose partners with select online retailers for limited-time promotions or bundles. However‚ the most comprehensive selection and personalized service remain exclusive to the Prose website. Customers can also find detailed product information‚ ingredient lists‚ and application instructions on the site.

Long-Term Scalp Health & Maintenance

Consistent use of Prose pre-shampoo scalp masks contributes significantly to long-term scalp health‚ fostering an optimal environment for hair growth. Beyond masking‚ maintaining a balanced lifestyle is key – a nutritious diet rich in vitamins and minerals supports scalp vitality.

Regular‚ gentle scalp massages stimulate blood circulation‚ promoting nutrient delivery to hair follicles. Avoid harsh chemical treatments and excessive heat styling‚ which can compromise scalp health over time. Protecting your scalp from sun exposure is also crucial; consider wearing a hat or using a UV protectant spray.

Prose masks‚ used in conjunction with a gentle cleansing routine and a healthy lifestyle‚ address underlying scalp concerns‚ preventing future issues. Monitoring your scalp for changes – dryness‚ flakiness‚ or irritation – allows for proactive adjustments to your hair care regimen.

Ultimately‚ long-term scalp health is a holistic endeavor‚ and Prose masks serve as a powerful tool within a comprehensive‚ preventative approach.

micro nc kit assembly instructions

Micro NC kits offer a streamlined, portable experience for enjoying concentrates. These innovative devices, featuring a nectar collector design, are gaining popularity amongst enthusiasts.

Historically, dab rigs were bulky; however, the micro NC provides a discreet alternative, evolving from niche hobby to mainstream consumption method.

Today’s market boasts diverse kits, like those from Myxed Up Creations, offering convenience and efficiency for concentrate users seeking a modern approach.

What is a Micro NC Nectar Collector?

A Micro NC Nectar Collector is a portable device designed for vaporizing concentrates, offering a unique “collecting” method. Unlike traditional dabbing, you directly touch the heated tip to your concentrate source.

Typically, a kit includes a nectar collector tip (titanium or quartz), a stainless steel nail, a glass straw/mouthpiece, and a water bubbler chamber – often with a four-slit design for diffusion.

The entire assembly allows for on-demand hits, providing a convenient and discreet alternative to larger, more cumbersome dab rigs. It’s a self-contained system for enjoying concentrates efficiently.

Brief History and Popularity

Initially emerging as a niche alternative to traditional dab rigs, Micro NC kits gained traction around 2015, offering increased portability and convenience. Early models were often DIY creations, evolving into refined, commercially available kits.

The popularity surge is linked to the growing concentrate market and demand for discreet consumption methods. Brands like Myxed Up Creations played a key role in popularizing the design.

Today, online retailers and local smoke shops widely stock Micro NCs, fueled by positive reviews and a growing community of enthusiasts sharing techniques and modifications.

Kit Components & Identification (December 22, 2025)

A standard Micro NC kit includes a nectar collector tip, stainless steel nail, glass straw, water bubbler, and a carrying case for convenient portability and storage.

Nectar Collector Tip (Titanium vs. Quartz)

The nectar collector tip is crucial, with titanium and quartz being the primary materials. Titanium heats rapidly and retains heat well, ideal for quick dabs, but can impart a metallic taste to some.

Quartz tips, conversely, offer a purer flavor profile due to their non-reactive nature. They heat slower but provide a cleaner, more nuanced experience. Choosing depends on preference; titanium for speed, quartz for flavor.

Modern kits often include both, allowing users to experiment and find their ideal style. Proper cleaning is vital for both materials to maintain optimal performance and taste.

Stainless Steel Nail

The stainless steel nail serves as the heating element within the Micro NC kit. It’s designed to withstand high temperatures required for vaporizing concentrates effectively. Unlike traditional nails, these are typically smaller and optimized for use with the nectar collector tip.

Stainless steel is a durable and affordable option, though it can retain flavors from previous uses if not cleaned thoroughly. Heating is usually achieved with a butane torch, requiring careful control to avoid overheating.

Proper maintenance, including regular cleaning, is essential for optimal performance and longevity of the nail.

Glass Straw/Mouthpiece

The glass straw, or mouthpiece, is a crucial component for comfortable inhalation. It connects directly to the water bubbler chamber, providing a filtered and cooled vapor path. Typically removable, it allows for easy cleaning and replacement if damaged.

Quality glass ensures a pure taste and prevents unwanted flavors from interfering with the concentrate’s profile. Proper handling is essential, as glass is fragile and prone to breakage.

Regular cleaning with isopropyl alcohol is recommended to maintain hygiene and optimal airflow.

Water Bubbler Chamber (Four-Slit Design)

The water bubbler chamber is a defining feature, providing essential filtration and cooling for a smoother experience. Specifically, the four-slit design maximizes surface area for enhanced diffusion, resulting in significantly cooler vapor.

Water filtration reduces harshness and improves the overall flavor profile of the concentrate. Careful filling is key – too much water can splash, while too little diminishes cooling.

Regular cleaning with warm water and alcohol prevents residue buildup and maintains optimal performance.

Red Box/Carrying Case

The included red box serves as a protective carrying case, ensuring safe transport and storage of your Micro NC kit. Its compact design makes it ideal for discreet portability, safeguarding delicate glass components from breakage during travel.

Beyond protection, the case helps organize all kit elements – tip, nail, straw, and bubbler – preventing loss or damage. Consider it an integral part of the kit, extending its lifespan and maintaining its value.

Proper storage within the case is crucial for long-term preservation.

Assembly Instructions ⸺ Step-by-Step

Begin by carefully connecting the nectar collector tip to the stainless steel nail. Then, attach the glass straw to the water bubbler chamber for optimal airflow.

Attaching the Tip to the Nail

Securely twisting the titanium or quartz tip onto the stainless steel nail is the first crucial step. Ensure a firm, yet gentle, connection to prevent air leaks during use. Avoid excessive force, as this could damage either component.

Inspect the connection point for any gaps or misalignment. A properly attached tip will sit flush against the nail, creating a seamless pathway for vapor. Double-check this connection before proceeding to the next assembly stage, guaranteeing optimal performance and a satisfying experience.

Remember, a stable connection is paramount for efficient nectar collection and overall kit functionality.

Connecting the Straw to the Bubbler

Carefully insert the glass straw, also known as the mouthpiece, into the designated opening on the water bubbler chamber. A snug fit is essential for effective filtration and a comfortable draw. Ensure the straw is fully seated within the bubbler’s connection point.

Gently twist the straw as you insert it to create a secure seal. Avoid applying excessive pressure, which could lead to breakage of the delicate glass components. Verify the connection is airtight before moving forward with the assembly process.

A secure straw connection is vital for a smooth and enjoyable inhalation experience.

Inserting the Nail into the Bubbler

Gently slide the stainless steel nail, with the attached nectar collector tip, into the central opening of the water bubbler chamber. Ensure the tip extends sufficiently into the chamber to allow for proper nectar collection and filtration.

Avoid forcing the nail, as this could damage the glass bubbler. Confirm the nail is stable and securely positioned within the bubbler before proceeding. A tight, yet not overly forceful, fit is ideal.

Proper nail insertion is crucial for efficient heating and a clean, flavorful experience.

Securing All Components

Once the nail is inserted into the bubbler and the straw is connected, carefully inspect the entire assembly. Ensure all connections are snug and stable to prevent air leaks during use. A secure fit is paramount for optimal performance.

Gently test the draw by lightly inhaling; any noticeable air leaks indicate a loose connection that needs adjustment. The red carrying case provides safe storage and transport for the fully assembled kit.

Double-checking all components guarantees a smooth and enjoyable experience.

Using Your Micro NC Kit

Proper technique is crucial for a satisfying experience. Begin by preparing your chosen concentrate and heating the nail to the ideal temperature for optimal flavor.

Carefully collect nectar, inhaling and exhaling slowly for a smooth draw, always prioritizing safety and responsible use.

Preparing Your Concentrate

Selecting high-quality concentrates is paramount for a flavorful and enjoyable experience. Options range from shatters and waxes to crumbles and budders, each offering unique characteristics.

Ensure your concentrate is free of impurities and properly stored to maintain its potency and consistency. A small dab, roughly the size of a grain of rice, is generally sufficient.

Place the concentrate onto a heat-resistant surface, such as parchment paper, for easy transfer to the heated nail. Precise measurement ensures efficient vaporization and minimizes waste.

Heating the Nail

Utilizing a butane torch, carefully heat the stainless steel nail. Apply the flame in a circular motion, focusing on the dish where the concentrate will contact the heated surface.

Avoid overheating, as this can degrade the concentrate and produce harsh vapor. A low and slow heating process is recommended for optimal flavor and efficiency.

Allow the nail to cool slightly before applying the concentrate – typically 20-30 seconds – to achieve the ideal vaporization temperature. Observe the nail’s color for temperature indication.

Collecting Nectar – Technique & Safety

Gently lower the heated tip of the nectar collector onto the concentrate. Slowly inhale while making contact, allowing the vapor to travel through the bubbler and straw.

Avoid applying excessive pressure, which can cause splashing or breakage. Maintain a steady draw for consistent vapor production and a smooth experience.

Exercise extreme caution with the hot tip. Never touch it directly, and always allow it to cool completely before disassembling or storing the kit. Safety first!

Inhalation & Exhalation

Begin inhaling gently as the tip contacts the concentrate, drawing the vapor through the water-filtered bubbler. Control your inhalation speed for optimal vapor density and temperature.

Hold the vapor briefly to allow for full absorption, then slowly exhale. Adjust inhalation and hold times to find your preferred experience.

Remember to stay hydrated and take breaks between sessions. Proper breathing technique enhances flavor and minimizes potential irritation. Enjoy responsibly!

Maintenance and Cleaning

Regular cleaning ensures optimal performance and longevity. Disassemble the kit carefully, focusing on glass and tip components. Prompt cleaning prevents residue buildup.

Proper storage in the provided case protects against damage. Consistent upkeep guarantees a smooth, flavorful experience with your micro NC kit.

Disassembling the Kit

Begin by gently twisting and pulling the tip away from the stainless steel nail. Avoid excessive force to prevent breakage, especially with quartz tips.

Next, carefully detach the glass straw/mouthpiece from the water bubbler chamber. A slight rocking motion can help loosen it.

Finally, separate the nail from the bubbler. Ensure a stable surface during disassembly to avoid accidental drops. Remember the order for reassembly!

Inspect each component for any damage or residue before proceeding to the cleaning stage.

Cleaning the Glass Components

Start by rinsing the bubbler chamber and straw with warm water to remove loose residue. For stubborn buildup, utilize isopropyl alcohol (91% or higher) and coarse salt.

Gently swirl the alcohol and salt mixture within the glass pieces, ensuring all surfaces are scrubbed. Avoid abrasive cleaners that can damage the glass.

Rinse thoroughly with warm water until all traces of alcohol are eliminated; Allow the components to air dry completely before reassembling the kit.

Regular cleaning maintains optimal flavor and hygiene.

Cleaning the Titanium/Quartz Tip

After each use, allow the titanium or quartz tip to cool completely before cleaning. Gently scrape away any remaining concentrate with a tool designed for dabbing.

For titanium tips, soak in isopropyl alcohol (99% recommended) for a thorough cleanse. Quartz tips can benefit from a brief alcohol soak, followed by a hot water rinse.

Avoid harsh chemicals or abrasive materials that could damage the tip’s surface. Ensure the tip is completely dry before reattaching it to the nail.

Consistent cleaning preserves tip performance.

Proper Storage

To maintain your Micro NC kit’s longevity, store it securely in the provided red box or a similar protective case when not in use. This prevents accidental breakage of delicate glass components.

Ensure all parts are completely dry before storage to avoid mildew or residue buildup. Keep the kit in a cool, dry place away from direct sunlight and extreme temperatures.

Consider storing the kit out of reach of children and pets. Proper storage safeguards your investment and ensures a clean, ready-to-use experience;

Troubleshooting Common Issues

Addressing issues like heating problems, air leaks, or broken parts is crucial. Careful inspection and proper re-assembly often resolve these concerns quickly and efficiently.

Uneven heating can be fixed by adjusting the heat source, while leaks require checking connections. Replacement parts are often available.

Difficulty Heating the Nail

Encountering trouble heating the stainless steel or titanium nail is a common issue. Ensure your heat source – typically a butane torch – is functioning correctly and providing a consistent flame.

Insufficient heat often stems from improper torch technique; maintain a safe distance and apply heat evenly around the nail’s perimeter. Avoid prolonged direct heat, which can damage the tip.

Consider the nail material; titanium requires slightly less heat than stainless steel. If problems persist, verify the nail is securely attached to the bubbler and free of obstructions.

Air Leaks & Poor Draw

Experiencing air leaks or a restricted draw significantly impacts the Micro NC experience. First, meticulously check all connections – tip to nail, straw to bubbler, and nail to bubbler – ensuring a tight seal.

Inspect the glass components for cracks or chips, as even minor damage can cause leaks. The straw mouthpiece should fit snugly into the bubbler’s opening, creating an airtight chamber.

Ensure the four-slit bubbler chamber isn’t clogged with residue. A poor draw often indicates an obstruction hindering airflow; thorough cleaning is frequently the solution.

Broken Glass Components

Unfortunately, glass breakage is a risk with Micro NC kits due to their delicate nature. If a glass component – bubbler, straw, or even the tip – breaks, immediately discontinue use.

Never attempt to use a cracked or shattered piece, as shards pose a serious safety hazard. Carefully dispose of broken glass, protecting yourself from cuts.

Replacement parts are readily available online or at local smoke shops. Prioritize purchasing high-quality replacements to maintain the kit’s functionality and safety.

Tip Not Heating Evenly

Uneven heating of the titanium or quartz tip is a common issue. Ensure your heat source provides consistent, even heat distribution across the tip’s surface.

Avoid direct flame contact, opting for a butane torch with a focused, controlled flame. Rotate the tip slowly during heating to promote uniform temperature.

If the problem persists, try a different torch or allow the tip to cool completely before reheating. Consistent technique is key to achieving optimal, even heating.

Safety Precautions

Prioritize safety when using your Micro NC kit. Handle heated components with care, store concentrates responsibly, and prevent glass breakage for a safe experience.

Heat Safety

Extreme caution is vital when heating the stainless steel nail or titanium/quartz tip. These components reach incredibly high temperatures very quickly, posing a significant burn risk.

Always use a heat source designed for concentrates, like a butane torch, and maintain a safe distance. Never touch the heated nail directly with skin or flammable materials.

Allow sufficient cooling time before handling or disassembling the kit. Consider using heat-resistant gloves or tools to avoid accidental burns during assembly or use.

Concentrate Handling

Concentrates are potent and should be handled with care. Avoid direct skin contact, as absorption can occur. Use appropriate tools – dab tools are ideal – for precise measurement and application to the heated tip.

Store concentrates securely, out of reach of children and pets, in airtight containers. Be mindful of local laws regarding concentrate possession and usage.

Start with a small amount; concentrates are highly concentrated, and a little goes a long way. Responsible handling ensures a safe and enjoyable experience.

Glass Breakage Prevention

Glass components are fragile; handle with utmost care during assembly, use, and cleaning. Avoid dropping or subjecting the kit to sudden impacts. Work over a soft surface like a towel to cushion potential falls.

Inspect glass regularly for cracks or chips. Discontinue use immediately if any damage is detected. Proper storage in a protective case, like the included red box, minimizes risk.

Allow components to cool completely before handling after use, as thermal shock can cause breakage. Gentle handling extends the lifespan of your kit.

Advanced Techniques & Modifications

Experimentation enhances the experience! Explore diverse concentrate types and optimize water levels for personalized cooling. Different tip materials alter flavor profiles.

Customization allows for tailored sessions, maximizing enjoyment and refining your preferred method of nectar collection.

Using Different Concentrate Types

Micro NC kits demonstrate versatility with various concentrates, though adjustments are key. Shatter, wax, and budder each possess unique consistencies impacting vaporization. Lower temperatures are generally recommended for more delicate concentrates to preserve terpenes and flavor.

Conversely, thicker consistencies may require slightly increased heat. Always start with a low temperature and gradually increase until optimal vaporization is achieved. Observe the concentrate’s reaction closely, avoiding combustion. Experimentation is crucial to discover the ideal settings for each specific concentrate type, ensuring a satisfying and flavorful experience.

Water Level Optimization

Optimizing the water level within the bubbler chamber significantly impacts the Micro NC experience. Too little water results in harsh, unfiltered vapor, while excessive water can impede airflow and cause splashing.

Ideally, the water level should gently cover the bottom slits of the downstem, providing sufficient diffusion without restricting draw. Experimentation is key; adjust the water level incrementally to find the sweet spot that delivers smooth, cool hits tailored to your preference. Proper water level ensures optimal filtration and enhances flavor.

Exploring Different Tip Materials

Micro NC kits commonly feature titanium or quartz tips, each offering unique characteristics. Titanium heats quickly and retains heat well, ideal for fast, flavorful dabs, but can impart a metallic taste to some.

Quartz, conversely, provides a purer flavor profile due to its non-reactive nature, though it heats slower and may require more precise temperature control. Experimenting with both materials allows users to discover their preferred experience, balancing flavor, heat retention, and overall enjoyment.

Where to Purchase Micro NC Kits

Micro NC kits are readily available online through retailers and local smoke shops. Myxed Up Creations is a reputable brand known for quality kits and components.

Consider comparing prices and reading reviews before purchasing to ensure a satisfying experience and a genuine product.

Online Retailers

Numerous online retailers specialize in smoking accessories, offering a wide selection of Micro NC kits. Platforms like eBay and specialized head shops frequently stock various brands and configurations, providing competitive pricing and diverse options.

When purchasing online, prioritize retailers with secure payment gateways and transparent shipping policies. Carefully review product descriptions and customer feedback to gauge quality and authenticity.

Always verify the retailer’s return policy in case of defects or dissatisfaction, ensuring a hassle-free experience. Look for established vendors with positive reputations within the community.

Local Smoke Shops

Visiting local smoke shops provides a hands-on experience when selecting a Micro NC kit. You can physically inspect the components, assess build quality, and receive personalized advice from knowledgeable staff.

These shops often carry popular brands like Myxed Up Creations and may offer exclusive deals or bundles. Building a rapport with your local shop can lead to informed recommendations and access to new products.

Remember to verify the shop’s reputation and ensure they comply with local regulations regarding the sale of smoking accessories.

Reputable Brands (Myxed Up Creations)

Myxed Up Creations stands out as a leading manufacturer of Micro NC kits, renowned for quality and innovative designs. Their kits frequently feature a four-slit bubbler chamber and include both titanium and quartz tip options.

Choosing a reputable brand ensures durable materials and consistent performance. Myxed Up Creations’ products are widely available and backed by positive customer reviews, offering peace of mind.

Their kits often include a convenient red box carrying case, enhancing portability and protection for your investment.

Micro NC vs. Traditional Dab Rigs

Micro NCs offer portability and discretion compared to traditional dab rigs, providing a convenient alternative for on-the-go concentrate consumption.

Cost-effectively, Micro NC kits can be more affordable, though high-end rigs offer advanced features and customization options.

Pros and Cons of Micro NCs

Micro NCs excel in portability and ease of use, making them ideal for discreet consumption. Their compact size and simplified setup—involving a tip, nail, and bubbler—offer convenience.

However, they often deliver smaller dabs compared to traditional rigs, potentially limiting session size. Cleaning can be intricate, especially the small nectar collector tip.

Furthermore, some users report a steeper learning curve for optimal technique, and the smaller size may not appeal to those preferring larger, more elaborate setups.

Portability and Discretion

Micro NC kits truly shine in portability, fitting neatly into a provided carrying case – often a red box – for on-the-go use. Their smaller footprint compared to traditional dab rigs makes them exceptionally discreet.

The self-contained nature of the kit minimizes the number of separate pieces, simplifying transport and reducing the risk of attracting unwanted attention.

This convenience is a major draw for users prioritizing privacy and the ability to enjoy concentrates in various settings without cumbersome equipment.

Cost Comparison

Micro NC kits generally represent a more affordable entry point into the world of concentrate consumption compared to elaborate dab rigs. Initial investment typically ranges from $50 to $200, depending on materials and brand.

Traditional dab rigs, with their complex setups – including torches, nails, and larger water pieces – can easily exceed $300 and climb significantly higher.

The lower cost of micro NCs makes them accessible to a wider range of users, offering a convenient and effective alternative without a substantial financial commitment.

Legal Considerations

Concentrate legality varies significantly by state; always research and adhere to local laws. Responsible use and understanding regulations are crucial for legal compliance.

State Laws Regarding Concentrates

Navigating concentrate laws requires diligent research, as regulations differ drastically across states. Some states permit medical or recreational cannabis, including concentrates, while others maintain strict prohibitions. Understanding THC limits is vital, as legal thresholds for concentrates often vary from flower.

Penalties for possession can range from minor fines to severe criminal charges, depending on the amount and local jurisdiction. Staying informed about evolving legislation is crucial for responsible and legal use of micro NC kits and concentrates.

Responsible Use

Prioritize moderation when utilizing your micro NC kit; concentrates are potent, and less is often more. Start with a small amount of concentrate to gauge your tolerance and avoid overconsumption. Never operate machinery or drive under the influence of cannabis.

Store concentrates securely, out of reach of children and pets. Be mindful of your surroundings and respect local laws regarding consumption. Responsible use ensures a safe and enjoyable experience with your kit.

allewie bed frame assembly instructions pdf

Allewie Bed Frame Assembly Instructions: A Comprehensive Guide

Accessing detailed Allewie bed frame assembly PDFs is crucial for a smooth setup; resources like prime-spaces.com offer free manuals for various models, including those with storage.

Understanding Your Allewie Bed Frame

Before beginning assembly, familiarize yourself with your specific Allewie bed frame model. Different designs – platform, storage, velvet wingback – necessitate unique approaches. Locating the correct PDF manual is the first step, as these guides detail component specifics and step-by-step procedures.

Allewie frames often feature headboards, side rails, footboards, center support beams, and slats. Some models incorporate storage drawers or lift-up mechanisms, adding complexity. The manual will illustrate each part clearly, preventing confusion during construction. Understanding the bed’s structure beforehand streamlines the process, minimizing errors and ensuring a stable, long-lasting result. Referencing the PDF throughout assembly is highly recommended.

Identifying All Components

The Allewie bed frame assembly PDF manual is essential for accurate component identification. Typically, you’ll find a detailed parts list with diagrams. Expect headboard and footboard pieces, side rails, a center support beam (often with legs), wooden slats, and hardware like screws, bolts, and washers.

Storage models, such as the Queen size platform bed with drawers or lift-up versions, include additional parts like drawer boxes, hydraulic lifts, and associated mounting hardware. Carefully compare each physical component to the illustrations in the manual to confirm you have everything needed. Missing parts can halt progress, so a thorough inventory is crucial before starting the assembly process;

Tools Required for Assembly

The Allewie bed frame assembly PDF often lists necessary tools, though some aren’t always included. A fundamental requirement is a screwdriver – both Phillips head and potentially flathead. An Allen wrench (hex key) is almost always needed, and frequently included with the hardware.

For easier and faster assembly, consider having a power drill with appropriate bits. However, use caution to avoid over-tightening screws! A rubber mallet can be helpful for gently securing parts, especially with tighter fits noted in some assembly experiences. A level ensures the bed is stable, and a worktable provides ample space. Refer to the manual for specific tool recommendations for your model.

Step-by-Step Assembly Process

Allewie assembly PDFs guide users through attaching rails, installing center supports, and adding slats, ensuring a secure mattress foundation for optimal sleep support.

Attaching the Side Rails to the Headboard

According to Allewie assembly PDFs, begin by carefully laying out all components on a protected floor surface. Align the side rails with the headboard, ensuring proper orientation as depicted in the manual; Utilize the provided bolts and washers to secure the rails to the headboard; some users note this step can be challenging.

The PDF instructions emphasize the importance of not fully tightening the bolts initially, allowing for adjustments during the subsequent steps. A vise or ample workspace can be beneficial, particularly when dealing with tighter connections. Double-check alignment before proceeding to the next phase of assembly, referencing the diagrams within the manual for clarity.

Proper attachment is fundamental for the bed frame’s overall stability and longevity, so meticulous attention to detail is key.

Connecting the Side Rails to the Footboard

Allewie assembly PDFs detail that, after attaching the side rails to the headboard, the process is mirrored for the footboard. Align the free ends of the side rails with the corresponding mounting points on the footboard, again referencing the manual’s diagrams for correct positioning.

The instructions reiterate the use of bolts and washers, advising against full tightening at this stage to maintain flexibility for adjustments. Ensuring a flush connection between the rails and footboard is vital for structural integrity. Some models may have specific footboard attachment methods detailed in their respective manuals.

Careful alignment and a methodical approach, guided by the PDF, will result in a secure and stable bed frame foundation.

Installing the Center Support Beam

Allewie bed frame assembly PDFs emphasize the importance of the center support beam for overall stability, particularly for larger sizes like Queen or King. Locate the beam and its supporting legs, referencing the manual’s illustrations for correct orientation.

Position the beam lengthwise down the center of the bed frame, ensuring the legs are evenly spaced and make firm contact with the floor. Secure the beam to the side rails using the provided screws or bolts, as detailed in the manual.

Tighten all connections firmly, but avoid over-tightening. This beam significantly reduces sagging and provides crucial support for the slats and mattress, as highlighted in the downloadable instructions.

Adding the Slats for Mattress Support

Allewie bed frame assembly PDFs clearly demonstrate the slat installation process, vital for proper mattress support. Lay the wooden or metal slats evenly across the frame, ensuring consistent spacing as shown in the manual’s diagrams.

Most models require securing the slats with plastic slat holders or screws. Refer to your specific manual for the correct attachment method; some designs feature pre-drilled holes for easy installation.

Evenly distribute the slats to prevent mattress sagging and ensure optimal weight distribution. The downloadable instructions often emphasize checking the spacing and secureness of each slat before proceeding, guaranteeing a stable and comfortable sleep surface.

Specific Models & Assembly Variations

Allewie bed frame assembly instructions PDFs vary by model – Queen with drawers, lift-up storage, or velvet wingback – each requiring a unique manual.

Allewie Queen Size Platform Bed with Storage Drawers

Assembling the Allewie Queen Size Platform Bed with storage drawers necessitates a specific assembly manual, often available as a downloadable PDF. These instructions detail attaching the headboard and side rails, crucial for structural integrity.

The manual guides you through installing the center support beam, vital for weight distribution, and then adding the slats to create a stable mattress foundation. A key focus is the drawer mechanism – the PDF provides step-by-step guidance for proper installation, ensuring smooth operation.

Pay close attention to diagrams illustrating drawer slide attachment and alignment. Resources like prime-spaces.com offer these manuals, simplifying the process and preventing common errors. Proper assembly guarantees both bed stability and functional storage.

Allewie Lift Up Storage Bed Assembly

Assembling the Allewie Lift Up Storage Bed requires careful adherence to the provided assembly manual, typically found as a downloadable PDF. This manual specifically details the complex lift mechanism installation, a critical step for safe and functional operation.

The instructions emphasize correctly attaching the gas struts and hinges, ensuring smooth lifting and secure closure. Diagrams illustrate proper alignment and fastening techniques. The PDF also covers the platform base construction and slat placement, providing a stable surface.

Resources like prime-spaces.com offer these manuals, simplifying the process. Pay close attention to weight capacity limits and safety precautions outlined in the manual. Correct assembly is paramount for maximizing storage space and ensuring long-term bed stability.

Allewie Velvet Bed Frame with Wingback Headboard

Assembling the Allewie Velvet Bed Frame, particularly with its striking wingback headboard, benefits greatly from a detailed assembly manual, readily available as a PDF download. These instructions focus on securely attaching the ornate headboard, often requiring precise alignment and robust fastening.

The manual provides step-by-step guidance for connecting the side rails and footboard, ensuring a stable frame to support the velvet upholstery. Diagrams clearly illustrate the process, highlighting specific screw placements and component orientations.

Resources online, like those mentioned, offer access to these crucial PDF guides. Note that the headboard’s size may necessitate two-person assembly. Following the manual diligently guarantees a beautiful and structurally sound bed.

Troubleshooting Common Assembly Issues

Allewie assembly manuals (PDF) address issues like headboard attachment and rail misalignment; referencing these guides is key to resolving common setup difficulties quickly.

Difficulty Attaching the Headboard

If you’re struggling with headboard attachment, consult the Allewie assembly manual (PDF) for specific model instructions. Several users have noted this step can be challenging, sometimes requiring significant force.

The manual often details proper alignment and the correct hardware to use. A larger vise or ample workspace, as some have suggested, can be incredibly helpful. Ensure you’re not over-tightening screws initially, allowing for adjustments.

Referencing diagrams within the PDF will clarify the process. If issues persist, double-check that all components are correctly oriented before applying pressure. The downloadable manual provides visual aids and troubleshooting tips to overcome this common hurdle.

Misaligned Side Rails

Addressing misaligned side rails requires careful review of your Allewie bed frame’s assembly manual (PDF). The manual provides diagrams illustrating the correct positioning and connection points. Begin by loosening all previously tightened bolts related to the rails and head/footboards.

Ensure the frame is on a level surface; uneven flooring can contribute to misalignment. Gently apply pressure to realign the rails, referencing the PDF’s visual guides.

The downloadable manual often highlights the importance of proper sequencing during assembly. Retighten bolts gradually, checking alignment after each adjustment. If significant misalignment persists, consult the manual for specific troubleshooting steps or contact Allewie support.

Missing Parts – What to Do

If parts are missing during Allewie bed frame assembly, the official assembly manual (PDF) is your first resource. It contains a comprehensive parts list for verification. Carefully cross-reference the components you have received against this list.

The PDF manual typically provides contact information for Allewie’s customer support. Reach out to them immediately, detailing the missing part(s) and your order number.

Be prepared to provide photos as proof. Allewie generally offers replacements for missing components. Avoid attempting to substitute parts, as this could compromise the bed’s structural integrity. Refer to the manual for specific part numbers to expedite the replacement process.

Safety Precautions During Assembly

The Allewie assembly PDF emphasizes proper lifting techniques and floor protection. Prioritize safety to prevent injury and damage during the bed frame construction process.

Protecting Your Flooring

Before beginning the Allewie bed frame assembly, safeguarding your flooring is paramount. The assembly manual, often available as a downloadable PDF, doesn’t explicitly detail floor protection, but it’s a vital step. Lay down a protective layer – a blanket, drop cloth, or cardboard – to prevent scratches and dents during the process.

Moving bed frame components can easily mar surfaces, especially hardwood or laminate. Consider using furniture sliders under the legs or rails as you position them. This minimizes friction and reduces the risk of damage. Careful planning and a protective barrier will ensure your floors remain pristine throughout the assembly, allowing you to enjoy your new Allewie bed without regret.

Proper Lifting Techniques

The Allewie bed frame assembly, detailed in the downloadable PDF manual, often involves handling moderately heavy components. Employing proper lifting techniques is crucial to prevent injury. Always bend at your knees, keeping your back straight, and avoid twisting while lifting.

If a component feels too heavy, enlist assistance. Don’t attempt to lift beyond your capabilities. Maintain a firm grip and keep the load close to your body for better balance. The manual may not explicitly state these precautions, but prioritizing safe lifting practices will ensure a smoother, injury-free assembly process. Remember, a well-assembled Allewie bed isn’t worth risking your health!

Finding the Official Allewie Assembly Manual (PDF)

Official Allewie assembly manuals in PDF format are readily available online, notably through resources like prime-spaces.com, ensuring a guided setup experience.

Accessing the Manual Online

Locating your Allewie bed frame’s assembly manual online is straightforward. Several websites host downloadable PDFs, simplifying the setup process. Prime-spaces.com provides a free resource for various Allewie models, including those with LED lighting and adjustable headboards.

A quick internet search for “Allewie bed frame assembly instructions PDF” will yield numerous results. These online manuals offer step-by-step guidance, diagrams, and parts lists, crucial for successful assembly.

Video tutorials, like those from T and T Finds showcasing the King Size bed frame assembly, can supplement the PDF instructions, providing a visual aid. Ensure the manual corresponds to your specific Allewie model for accurate guidance.

Downloading and Printing the PDF

Once you’ve located the correct Allewie bed frame assembly PDF online – often found on sites like prime-spaces.com – downloading is typically a simple click. Ensure your download source is reputable to avoid any potential security risks.

After downloading, open the PDF with a compatible reader (like Adobe Acrobat Reader). To print, select the “Print” option and adjust settings as needed – consider printing in landscape mode for clearer diagrams.

Having a physical copy readily available during assembly is highly recommended, allowing you to easily reference instructions without constantly switching between devices. A printed manual keeps your screen clean and accessible.

Post-Assembly Checks & Maintenance

After assembly, confirm stability and tightness of all connections; regularly inspect screws to ensure continued structural integrity, referencing the manual if needed.

Ensuring Stability and Tightness

Post-assembly, a thorough check for stability is paramount. Gently rock the bed frame to identify any wobbling or unevenness. Refer to your Allewie bed frame assembly instructions PDF to re-tighten all bolts and screws, paying close attention to those connecting the headboard and side rails.

A common issue, noted in online discussions, involves difficulty squeezing the headboard components together – ensure a firm, secure fit. Double-check the center support beam’s connections, as this significantly impacts overall stability. Regularly inspect all fasteners; loose screws can develop over time with use. The official manual provides torque specifications, if available, for optimal tightening. Prioritize safety and a solid build!

Regularly Inspecting for Loose Screws

Consistent maintenance, guided by your Allewie bed frame assembly instructions PDF, is key to longevity. Implement a routine – every three to six months – to inspect all screws and bolts. Pay particular attention to connections between the headboard, footboard, side rails, and center support beam.

Vibration from regular use can cause fasteners to loosen over time. The manual may detail specific torque recommendations for re-tightening. If you notice any wobble or creaking, immediately investigate and tighten any loose components. Don’t overtighten, as this can strip the threads. Keeping a simple toolkit handy facilitates these quick checks, ensuring continued stability and preventing potential issues down the line.

hard boiled egg cooker instructions

Hard boiled egg cookers simplify breakfast preparation‚ offering consistent results and convenience. These electric appliances quickly steam eggs to desired doneness‚ saving valuable time.

Many models accommodate up to six eggs‚ perfect for families or meal prepping. They’re a fantastic solution for perfectly cooked eggs‚ every time!

What is a Hard Boiled Egg Cooker?

A hard boiled egg cooker is a small countertop electric appliance specifically designed for cooking eggs. Unlike traditional stovetop methods‚ these cookers utilize steam to gently and evenly cook eggs to your preferred consistency – soft‚ medium‚ or hard-boiled.

These devices typically consist of a heating element‚ a water reservoir‚ and an egg tray. They offer a convenient‚ hands-off approach‚ often featuring automatic shut-off functions. The Dash Rapid Egg Cooker‚ a popular choice‚ exemplifies this simplicity.

They eliminate guesswork‚ preventing over or undercooking‚ and are a great alternative for consistent results.

Benefits of Using an Egg Cooker

Egg cookers offer numerous advantages over conventional methods. They provide consistent‚ perfectly cooked eggs without the risk of cracking or overcooking‚ a common issue with stovetop boiling. The convenience is significant; simply add water‚ load the eggs‚ and select your desired setting.

Many models‚ like the Cuisinart Egg Central‚ boast automatic shut-off features‚ enhancing safety and freeing up your time. They’re also energy-efficient‚ using less water and electricity than boiling a pot.

Furthermore‚ they’re versatile‚ capable of poaching eggs and steaming vegetables!

Types of Hard Boiled Egg Cookers

Egg cookers fall into three main categories: electric‚ manual‚ and multi-functional. Electric models offer automated convenience‚ while manual require more user involvement.

Multi-functional units expand capabilities beyond just eggs!

Electric Egg Cookers

Electric egg cookers represent the pinnacle of convenience‚ automating the entire cooking process. These appliances utilize steam to gently cook eggs to your preferred consistency – soft‚ medium‚ or hard-boiled.

Popular models like the Dash Rapid Egg Cooker and Elite Gourmet series boast simple operation and consistent results. Typically‚ you add water to a designated fill line‚ load the eggs onto the tray‚ and select your desired setting.

The cooker then automatically shuts off when the eggs are done‚ preventing overcooking. Many feature a warming function to keep eggs at the perfect temperature until serving. They are a great choice for busy mornings!

Manual Egg Cookers

Manual egg cookers offer a budget-friendly and space-saving alternative to electric models. These typically consist of a pot with a steaming rack‚ requiring stovetop monitoring.

To use‚ add water to the pot‚ place eggs on the rack‚ and bring to a boil. Once boiling‚ reduce heat and simmer for the desired time – less for soft-boiled‚ longer for hard-boiled.

While requiring more attention‚ manual cookers provide precise control over the cooking process. They are ideal for those who prefer a traditional method or have limited counter space. Cooling eggs immediately after cooking is crucial for easy peeling.

Multi-Functional Egg Cookers

Multi-functional egg cookers expand beyond basic boiling‚ offering versatility in the kitchen. These appliances often include features for poaching‚ steaming‚ and even making omelets.

Many models‚ like the Cuisinart Egg Central‚ boast multiple cooking trays and settings. This allows simultaneous preparation of eggs cooked to different preferences. Some can steam vegetables alongside eggs‚ creating complete breakfasts.

Using these cookers involves adding water‚ selecting the appropriate function‚ and pressing start. They simplify complex breakfast routines‚ offering convenience and diverse cooking options. Cleaning is generally straightforward‚ with removable parts.

Top Egg Cooker Models (2025)

In 2025‚ leading egg cookers include Dash Rapid‚ Elite Gourmet‚ Cuisinart Egg Central‚ and Nostalgia models. Each offers unique features and capacities for perfect eggs.

Dash Rapid Egg Cooker

The Dash Rapid Egg Cooker stands out as a popular and highly-rated choice‚ often considered the best for effortless hard-boiled eggs. This compact appliance boasts a six-egg capacity‚ ideal for individuals or small families.

Users consistently praise its simplicity and reliability‚ guaranteeing perfectly cooked eggs every time. It’s also known for its automatic shut-off feature‚ providing peace of mind. The Dash Rapid Egg Cooker is frequently highlighted as the “original” and most trusted option on the market‚ offering consistent performance and user satisfaction.

It’s a great entry point into the world of egg cookers!

Elite Gourmet EGC115M

The Elite Gourmet EGC115M is a versatile egg cooker with a seven-egg capacity‚ making it suitable for slightly larger households. It offers settings for soft‚ medium‚ and hard-boiled eggs‚ providing customizable cooking options.

This model is praised for its straightforward operation and ability to consistently deliver desired results. Its compact design makes it easy to store‚ and the durable construction ensures long-lasting performance. The EGC115M is a reliable choice for those seeking a simple and effective way to prepare eggs quickly and efficiently.

A solid‚ dependable option!

Elite Gourmet EGC-007B

The Elite Gourmet EGC-007B boasts a larger‚ fourteen-egg capacity‚ ideal for families or those who frequently cook for groups. This electric egg cooker features multi-mode functionality‚ allowing for diverse cooking preferences beyond just hard-boiled eggs.

Users appreciate its ability to handle larger quantities without compromising cooking quality. The multi-mode settings expand its versatility‚ making it suitable for various egg preparations. Its robust build and user-friendly design contribute to a positive cooking experience. A great choice for bigger batches!

Cuisinart Egg Central

The Cuisinart Egg Central stands out as a sturdy and reliable option‚ favored for its user-friendly interface and optimal egg capacity. It’s designed to consistently deliver perfectly cooked eggs‚ whether you prefer them soft‚ medium‚ or hard-boiled.

Reviewers highlight its durable construction and intuitive controls‚ making it a breeze to operate. The appliance fits a suitable amount of eggs‚ catering to most household needs. Its consistent performance and ease of cleaning make it a top pick for those seeking a dependable egg cooker.

Nostalgia Egg Cooker

The Nostalgia Egg Cooker consistently produces flawless‚ perfectly cooked hard-boiled eggs. This retro-styled appliance offers a simple and effective way to enjoy eggs prepared exactly to your liking. It’s praised for its reliable performance and ability to deliver consistent results with each use.

Users appreciate its straightforward operation and compact design‚ making it ideal for smaller kitchens. The Nostalgia Egg Cooker is a great choice for those seeking a no-fuss solution for consistently perfect eggs‚ offering convenience and quality in one charming package.

Evoloop Electric Egg Cooker

The Evoloop Electric Egg Cooker stands out with its six-egg capacity and efficient steaming technology. This cooker provides a convenient and reliable method for preparing hard-boiled‚ soft-boiled‚ or poached eggs with ease. Its compact design makes it a great addition to any kitchen countertop‚ saving valuable space.

Users highlight its simple operation and consistent results‚ ensuring perfectly cooked eggs every time. The Evoloop offers a practical solution for busy mornings or meal prepping‚ delivering delicious eggs with minimal effort and maximum convenience.

Using Your Egg Cooker: A Step-by-Step Guide

Egg cookers are remarkably simple! Add water to the marked line‚ load eggs onto the tray‚ select your desired setting‚ and let the cooker work its magic.

Adding Water to the Cooker

Proper water measurement is crucial for perfectly cooked eggs. Most egg cookers feature marked lines inside the measuring cup and on the appliance itself.

These lines correspond to different egg consistencies – soft‚ medium‚ or hard-boiled. Carefully pour the indicated amount of water into the base of the cooker.

Avoid overfilling‚ as this can result in watery eggs. Underfilling may lead to uneven cooking. Always use the provided measuring cup for accuracy‚ ensuring optimal results every time.

Refer to your cooker’s manual for specific water level guidelines‚ as they can vary slightly between models.

Loading the Eggs

Gently place the eggs into the egg tray‚ ensuring they are arranged in a single layer. Avoid overcrowding‚ as this can hinder even cooking.

Most cookers accommodate up to six or seven eggs‚ depending on the model. For smaller eggs‚ you may be able to fit slightly more.

Ensure the eggs are securely seated in the tray to prevent them from shifting during the cooking process.

Piercing the larger end of each egg with the included piercing tool is recommended to prevent cracking. Carefully place the tray into the cooker base.

Selecting the Cooking Setting

Most egg cookers feature pre-set settings for soft‚ medium‚ and hard-boiled eggs. Refer to your cooker’s manual for specific guidance.

Use the control dial or buttons to select your desired level of doneness. Some models offer additional settings for poached eggs or omelets.

For hard-boiled eggs‚ select the “hard” setting. If your cooker has a water level indicator‚ adjust the water accordingly.

Experiment with different settings to find your perfect egg consistency. Remember‚ cooking times may vary slightly based on egg size and altitude.

The Cooking Process

Once the eggs are loaded and the setting is selected‚ simply turn on the egg cooker. The appliance will automatically heat the water and begin steaming the eggs.

Most cookers feature an automatic shut-off function‚ signaling the completion of the cooking cycle with a beep or light. Avoid opening the lid during the process.

Allow the eggs to cool slightly before transferring them to an ice bath. This stops the cooking process and makes peeling easier. Enjoy your perfectly cooked eggs!

Remember to always unplug the cooker after use and allow it to cool completely before cleaning.

Achieving Perfect Hard Boiled Eggs

Egg cookers deliver consistent results‚ but water levels and cooking times impact doneness. Experiment to find your ideal settings for soft‚ medium‚ or hard-boiled eggs!

Water Level for Hard Boiled Eggs

Determining the correct water level is crucial for successful egg cooking. Most egg cookers include measuring lines on the interior‚ indicating levels for soft‚ medium‚ and hard-boiled eggs.

Generally‚ for hard-boiled eggs‚ use the maximum fill line indicated in your cooker’s instructions. Insufficient water can lead to unevenly cooked eggs‚ while excessive water might result in a diluted flavor.

Always refer to your specific model’s manual‚ as water level recommendations can vary. Precise measurements ensure consistent‚ perfectly cooked eggs every time‚ eliminating guesswork!

Cooking Time for Different Preferences (Soft‚ Medium‚ Hard)

Egg cookers offer pre-set cooking options for varying preferences. Typically‚ a cooker will have settings for soft‚ medium‚ and hard-boiled eggs‚ indicated by water level and automatic shut-off.

For soft-boiled eggs with a runny yolk‚ use the lowest water level and corresponding setting. Medium-boiled eggs require a mid-level water mark and setting‚ yielding a slightly set yolk. Hard-boiled eggs need the maximum water level and setting.

Cooking times are automated‚ but always consult your cooker’s manual for precise durations!

Troubleshooting Common Issues

Egg cookers are generally reliable‚ but issues can arise. If eggs aren’t cooking‚ ensure the cooker is properly plugged in and the water level is correct. Cracked eggs can sometimes leak‚ causing uneven cooking; use fresh eggs and avoid overfilling.

If eggs are difficult to peel‚ try shocking them in ice water immediately after cooking. Mineral buildup can affect performance; regular descaling is crucial. Always refer to your cooker’s manual for specific troubleshooting steps!

Cleaning and Maintenance

Regular cleaning extends your egg cooker’s life. After each use‚ unplug and wash the tray with warm‚ soapy water. Descale periodically to remove mineral buildup!

Cleaning After Each Use

Consistent cleaning is crucial for maintaining your egg cooker’s performance and hygiene. Always begin by ensuring the appliance is completely unplugged and cooled down before attempting any cleaning procedures. Carefully remove the egg tray and rinse it under warm‚ soapy water‚ gently removing any residual egg residue.

The heating plate should be wiped down with a damp cloth; avoid abrasive cleaners that could damage the surface. Ensure all components are thoroughly dried before reassembling the cooker. This simple routine prevents buildup and ensures optimal functionality for countless perfectly cooked eggs!

Descaling the Egg Cooker

Mineral buildup from water can affect your egg cooker’s efficiency over time‚ necessitating descaling. To descale‚ fill the cooker with a mixture of equal parts water and white vinegar. Run a full cooking cycle without eggs‚ allowing the solution to circulate and dissolve mineral deposits.

After the cycle completes‚ empty the cooker and rinse thoroughly with clean water‚ repeating several times to remove any lingering vinegar scent. Regular descaling – every 1-3 months‚ depending on water hardness – will prolong your cooker’s lifespan and maintain optimal performance.

Safety Precautions

Always unplug the egg cooker before cleaning. Avoid touching hot surfaces during or immediately after use. Ensure proper ventilation and never immerse the base in water.

Electrical Safety

Prioritize electrical safety when using your egg cooker. Always ensure the voltage of the appliance matches your household’s power supply to prevent damage or hazards. Never operate the cooker with a damaged cord or plug; replace them immediately.

Avoid using extension cords if possible‚ and if necessary‚ choose one rated for the appliance’s wattage. Keep the cooker away from water sources and never attempt to disassemble or repair it yourself. Unplug the device when not in use and before cleaning. Proper grounding is crucial for preventing electric shock.

Handling Hot Surfaces

Exercise extreme caution when handling your egg cooker‚ as several surfaces become very hot during and immediately after operation. Always use oven mitts or pot holders when touching the exterior housing‚ the heating plate‚ or the egg tray.

Avoid direct contact with these components to prevent burns. Be particularly careful when removing the egg tray‚ as it will retain heat. Allow the cooker to cool completely before cleaning or storing. Keep children and pets away from the appliance during and after use to avoid accidental burns.

Egg Cooker Feature Comparison

Comparing models reveals varying capacities‚ from six to fourteen eggs. Cooking modes range from simple hard/soft settings to multi-functional options‚ plus automatic shut-off features.

Capacity Comparison

Egg cookers demonstrate a wide range of capacities‚ catering to individual needs and household sizes. The Dash Rapid Egg Cooker‚ a popular choice‚ typically accommodates up to six eggs‚ ideal for smaller families or personal use.

Conversely‚ the Elite Gourmet EGC-007B boasts a larger fourteen-egg capacity‚ making it suitable for larger gatherings or extensive meal preparation. Other models‚ like the Elite Gourmet EGC115M‚ offer a seven-egg capacity‚ striking a balance between convenience and volume.

Consider your typical usage when selecting a cooker; a larger capacity isn’t always necessary‚ and a smaller unit may be more practical for limited counter space.

Cooking Mode Options

Egg cookers offer diverse cooking modes beyond simply “hard-boiled.” Many models‚ such as the Elite Gourmet EGC-007B‚ feature multi-mode settings allowing for soft or medium-boiled eggs‚ catering to individual preferences.

Some advanced cookers‚ like the Cuisinart Egg Central‚ expand functionality to include poaching and omelet-making capabilities; The Dash Rapid Egg Cooker focuses on simplicity‚ offering settings for hard‚ medium‚ and soft eggs.

Consider your desired versatility when choosing a cooker; if you enjoy poached eggs or omelets‚ a multi-functional model is a worthwhile investment.

Automatic Shut-Off Features

A crucial safety and convenience feature in egg cookers is the automatic shut-off. This prevents overcooking and potential damage to the appliance‚ ensuring worry-free operation. Most electric egg cookers‚ including the Dash Rapid Egg Cooker and Evoloop Electric Egg Cooker‚ incorporate this function.

Once the selected cooking cycle is complete‚ the cooker automatically powers down‚ preserving eggs and conserving energy. This feature is particularly useful for busy mornings or when multitasking.

Always verify that your chosen model includes automatic shut-off for enhanced safety and peace of mind.

Beyond Hard Boiled Eggs: Other Uses

Egg cookers aren’t limited to eggs! Many models can steam vegetables‚ poach eggs‚ or even create small omelets‚ expanding kitchen versatility.

Enjoy diverse cooking options!

Poaching Eggs

Poaching eggs with an egg cooker is surprisingly simple! Most models include a poaching tray‚ allowing you to create perfectly formed eggs without the fuss of simmering water and vinegar.

Simply add water to the indicated line‚ place the eggs in the poaching tray‚ and select the poaching setting. The cooker gently steams the eggs‚ resulting in tender whites and runny yolks. This method eliminates the need for constant monitoring and reduces the risk of broken yolks. It’s a fantastic alternative to traditional poaching!

Cleanup is also a breeze‚ making poached eggs a convenient and healthy breakfast option.

Steaming Vegetables

Believe it or not‚ your egg cooker can also steam vegetables! This is a convenient way to prepare a quick and healthy side dish alongside your eggs. Utilize the steaming tray (often included or available separately) and add water to the designated fill line.

Cut vegetables like broccoli‚ carrots‚ or green beans into bite-sized pieces and arrange them on the tray. Select the steaming setting‚ and the cooker will gently steam the vegetables to tender-crisp perfection. This method preserves nutrients and requires minimal effort.

It’s a versatile function for a compact appliance!

Making Omelets

Some egg cookers‚ particularly multi-functional models‚ offer an omelet-making capability! This feature typically involves a dedicated omelet tray or dish that fits inside the cooker. Whisk your eggs with your desired fillings – cheese‚ vegetables‚ or meats – and pour the mixture into the tray.

Select the omelet setting‚ and the cooker will gently cook the eggs‚ creating a fluffy and delicious omelet; Cooking times may vary depending on the model‚ so consult your instruction manual. It’s a surprisingly easy way to enjoy a customized breakfast!

Where to Buy Egg Cookers

Egg cookers are widely available at online retailers like Amazon and Walmart‚ plus brick-and-mortar stores such as Target and Best Buy for immediate purchase.

Online Retailers

Online retailers provide a vast selection of egg cookers‚ often with competitive pricing and customer reviews. Amazon consistently offers a wide range of models‚ including the Dash Rapid Egg Cooker and Elite Gourmet options‚ with convenient shipping options.

Walmart’s website also features numerous egg cookers‚ frequently offering deals and discounts. Target‚ through its online store‚ presents a curated selection‚ ensuring quality and reliability. Comparing prices and reading customer feedback across these platforms is highly recommended before making a purchase. Many sites offer free shipping with minimum order values‚ adding to the convenience.

Brick-and-Mortar Stores

Brick-and-mortar stores allow for a hands-on experience when purchasing an egg cooker. Walmart and Target typically stock several models‚ enabling customers to physically examine the product before buying. Best Buy occasionally carries select egg cookers‚ often alongside other small kitchen appliances.

Department stores like Kohl’s and Macy’s may also feature egg cookers‚ particularly during sales events. Visiting these stores provides the opportunity to ask sales associates questions and receive immediate assistance. Checking local appliance stores can reveal specialized models and expert advice.

Is an Egg Cooker Worth It?

Egg cookers offer significant convenience for hard-boiled egg enthusiasts. They eliminate guesswork‚ consistently delivering perfectly cooked eggs – soft‚ medium‚ or hard – with minimal effort. For those frequently enjoying eggs‚ the time saved and consistent results justify the investment.

Considering the affordability of many models‚ like the Dash Rapid Egg Cooker‚ the benefits outweigh the cost. They’re especially valuable for busy individuals or families seeking a quick and healthy breakfast option. Ultimately‚ an egg cooker is a worthwhile addition to any kitchen.

castle playmobil instructions

Playmobil Castle Instructions: A Comprehensive Guide (Updated 12/22/2025)

Finding Playmobil castle instructions is now easier than ever! PDF manuals for sets like 3666‚ 6849‚ and 70448 (Argos version) are available online.
Playmobil.com offers downloadable instructions‚ and spare parts services are readily accessible.

Playmobil castles have captivated children – and collectors – since 1974‚ offering a gateway to imaginative medieval worlds. These iconic toys aren’t simply pre-built structures; they’re construction sets designed to foster creativity and problem-solving skills. From the classic Playmobil 3666 Knights Kings Large Castle to the more recent Royal Residence 6849 and Princess Castle 70448‚ each set provides hours of engaging play.

However‚ the joy of building a Playmobil castle can sometimes be interrupted by missing instructions or lost pieces. Fortunately‚ Playmobil recognizes this and provides extensive resources for owners. Understanding how to locate and utilize these resources – whether it’s downloading a PDF manual from Playmobil.com or utilizing the online spare parts service – is key to a successful building experience.

The enduring appeal of Playmobil castles lies in their modular design. Hans Beck‚ the creator of Playmobil‚ intentionally designed the figures and components to be easily assembled and reconfigured‚ encouraging children to build and rebuild‚ creating their own unique kingdoms. This focus on foundational play is a core element of the brand’s success.

Popular Playmobil Castle Sets

Several Playmobil castle sets have achieved iconic status among collectors and enthusiasts. The Playmobil 3666 Knights Kings Large Castle remains a highly sought-after classic‚ known for its impressive size and detailed design. Its building instructions are readily available online in PDF format‚ ensuring continued enjoyment for generations.

The Playmobil Royal Residence 6849 offers a more regal aesthetic‚ appealing to those who prefer a sophisticated castle experience. Similarly‚ the Playmobil Princess Castle 70448 (often found as an Argos exclusive) provides a charming and colorful setting for fairytale adventures. Finding the correct manual for the Argos version is crucial‚ as it may differ slightly from other releases.

Beyond these flagship sets‚ numerous other Playmobil castles cater to diverse preferences‚ from smaller‚ more affordable options to expansive‚ multi-level fortresses. Regardless of the set‚ Playmobil consistently prioritizes detailed craftsmanship and engaging play value. Accessing the appropriate building instructions – often downloadable as PDFs – is essential for maximizing the building experience.

Finding Playmobil Castle Instructions Online

Locating Playmobil castle building instructions online has become remarkably straightforward. The official Playmobil website (Playmobil.com) now hosts a comprehensive library of downloadable PDF manuals. While direct links to individual sets aren’t always provided‚ navigating the “Building Instructions” section allows users to find instructions by article number.

Numerous fan-created websites and online forums also archive Playmobil instructions. A simple web search for “[Playmobil set number] instructions PDF” often yields positive results. Websites dedicated to Playmobil collecting frequently offer scanned copies of original manuals‚ providing a valuable resource for owners of vintage sets.

It’s important to verify the authenticity and completeness of downloaded instructions. Ensure the PDF is clear and legible‚ and that it corresponds to the specific version of your castle set. For sets like the Princess Castle 70448 (Argos version)‚ confirming the manual matches the retailer’s release is particularly important.

Playmobil 3666 Knights Kings Large Castle Instructions

The Playmobil 3666 Knights Kings Large Castle is a highly sought-after set‚ and thankfully‚ its building instructions are readily available online. You can easily view and download a PDF version of the complete manual for free. These instructions detail the step-by-step assembly of the castle‚ including its towers‚ walls‚ gatehouse‚ and interior features.

The manual guides builders through the placement of all components‚ from the foundational baseplates to the intricate decorative elements. It also illustrates how to attach accessories like ladders‚ flags‚ and weaponry. Careful attention to the instructions ensures a structurally sound and visually impressive castle build.

Many online resources host the Playmobil 3666 manual‚ making it accessible even if the original is lost or damaged. Searching for “Playmobil 3666 instructions PDF” will quickly lead you to downloadable copies. Remember to check the file’s integrity before printing or following along digitally.

Playmobil Royal Residence 6849 Instructions

Detailed building instructions for the Playmobil Royal Residence 6849 are available in PDF format‚ allowing for easy access and download. This set‚ known for its elegant design and intricate details‚ requires a comprehensive manual to ensure proper assembly. The PDF provides a clear‚ step-by-step guide to constructing the residence‚ including its various chambers‚ balconies‚ and decorative features.

The instructions meticulously illustrate the placement of each component‚ from the foundation to the roof‚ and showcase how to integrate the included furniture and figures. Builders can follow along to recreate the majestic Royal Residence accurately. The manual also highlights the connection points for various accessories‚ enhancing the playability and aesthetic appeal of the completed model.

While specific links may not be directly provided by Playmobil.com‚ searching online for “Playmobil 6849 instructions PDF” will yield numerous sources offering downloadable copies. Ensure the source is reputable before downloading to guarantee a complete and accurate manual.

Playmobil Princess Castle 70448 Instructions (Argos Version)

The Playmobil Princess Castle 70448‚ specifically the Argos version (952/3801)‚ requires a dedicated instruction manual for successful construction. This enchanting castle‚ brimming with regal details‚ benefits from a clear‚ step-by-step guide to ensure a delightful building experience. Fortunately‚ a PDF version of the manual is readily available online‚ catering to those who may have misplaced the original.

This PDF document meticulously outlines the assembly process‚ showcasing each component’s placement and connection points. It guides builders through constructing the castle’s towers‚ walls‚ and interior spaces‚ including the throne room and royal chambers. The instructions also demonstrate how to incorporate the included princess figures‚ furniture‚ and accessories‚ enhancing the castle’s play value.

Product support for this Argos-exclusive version is also available‚ alongside the downloadable manual. Searching online for “Playmobil 70448 instructions PDF” will quickly locate the necessary resources for a seamless build.

Understanding Playmobil Instruction Manuals

Playmobil instruction manuals are designed for clarity‚ utilizing visual step-by-step guides rather than extensive text. These manuals typically employ numbered diagrams‚ illustrating the precise placement of each component during the building process. Recognizing the symbols and visual cues within these guides is key to a smooth construction experience.

Older manuals‚ like those from 1993‚ often feature a simple numbering system and clear illustrations printed in Germany. Newer manuals may incorporate more detailed graphics and potentially utilize online resources for supplementary guidance. Regardless of the age‚ Playmobil prioritizes intuitive assembly.

It’s important to note that Playmobil encourages creative building‚ and the manuals serve as a foundation‚ not a rigid constraint. Builders are welcome to modify and customize their castles beyond the provided instructions. When downloading PDF versions‚ check the producer and version information for compatibility and clarity.

Locating Missing or Defective Parts

Playmobil understands that pieces can sometimes go missing or arrive defective. Fortunately‚ they offer a comprehensive online spare parts service designed for quick and convenient replacements. This service allows you to identify and order individual components directly from Playmobil‚ ensuring your castle construction isn’t halted by a single missing brick.

To utilize the service‚ you’ll typically need the set number (e.g.‚ 3666‚ 6849‚ 70448) and the specific part number. Playmobil’s website provides resources to help identify these numbers. Detailed exploded views of sets are often available‚ aiding in pinpointing the exact component needed.

Before contacting the spare parts service‚ double-check the packaging and surrounding area – small pieces can easily be overlooked. If a part is genuinely missing or damaged‚ the Playmobil service offers a reliable solution‚ keeping your castle building experience enjoyable and complete.

Playmobil Castle Building Techniques

Playmobil castle construction isn’t just about following the PDF instructions; it’s about understanding how the pieces connect and utilizing techniques for stability and aesthetic appeal. Begin by establishing a solid foundation‚ ensuring the baseplates are securely interlocked. When building walls‚ stagger the brick placement for increased strength‚ mimicking real masonry.

Pay close attention to the instruction manual’s depiction of connecting points. Playmobil utilizes a clever clip system; ensure each piece is firmly attached to prevent collapses during play. Towers often benefit from a wider base‚ and incorporating angled pieces can add visual interest and structural integrity.

Don’t be afraid to experiment! While the instructions provide a guide‚ Playmobil encourages creativity. Consider adding extra details like flags‚ banners‚ or custom landscaping to personalize your castle. Remember‚ a well-built castle is both sturdy and visually impressive.

Advanced Castle Building & Modifications

Beyond the standard Playmobil castle instructions lies a world of advanced building and modification techniques. Experienced builders often combine multiple sets‚ integrating elements from different eras – Knights‚ Royal Residence‚ and even Pirate themes – to create sprawling‚ unique fortresses.

Structural modifications involve reinforcing walls with hidden supports or creating custom gate mechanisms using Playmobil gears and connectors. Consider incorporating lighting elements for dramatic effect‚ or building elaborate dungeons and secret passages. Utilizing non-Playmobil materials‚ like cardboard or foam‚ can expand the castle’s footprint and add unique features.

Master builders frequently customize figures with repainted armor or modified weaponry. Remember to prioritize stability when undertaking ambitious modifications. Careful planning and a solid understanding of Playmobil’s connection system are crucial for success. Explore online forums for inspiration and shared techniques!

Playmobil Castle Toy Photography Tips

Capturing the majesty of your Playmobil castle requires more than just pointing and shooting. Consider lighting – soft‚ diffused light minimizes harsh shadows‚ while strategic backlighting can create dramatic silhouettes. Experiment with different angles; a low angle emphasizes the castle’s imposing size‚ while a bird’s-eye view showcases its layout.

Depth of field is key. A shallow depth of field isolates your figures and castle details‚ blurring the background for a professional look. Utilize miniature figures to tell a story – knights defending the walls‚ a royal procession‚ or even a daring rescue.

Post-processing can enhance your photos. Adjusting brightness‚ contrast‚ and saturation can bring out the colors and details. Consider using editing software to remove distractions or add subtle effects. Remember the 16:9 aspect ratio for cinematic shots‚ as seen in examples like “Playmobil rescuers brave harsh snow flurries…” – creating immersive scenes!

Historical Context of Playmobil Castles (1974 ⎼ Present)

Playmobil’s journey began in 1974‚ conceived by Hans Beck‚ a skilled craftsman with a background in model making. Initially designed as a system play concept‚ Playmobil prioritized simplicity and fostering children’s imagination – building‚ not just assembling. The first Playmobil figures weren’t pre-assembled‚ encouraging creative combination and storytelling.

Castles quickly became a cornerstone of the Playmobil universe‚ evolving from basic structures to elaborate fortresses like the iconic 3666 Knights Kings Large Castle. Throughout the decades‚ Playmobil castles mirrored changing trends‚ incorporating more detailed designs and play features.

Geobra Brandstätter‚ the company behind Playmobil‚ consistently updated castle sets‚ responding to consumer demand and technological advancements. From the 1993 German-printed manuals (No. 30 80 093 05.01) to today’s downloadable PDF instructions‚ Playmobil has adapted to provide accessible building guides‚ ensuring continued enjoyment for generations of castle builders.

Playmobil Castle Spare Parts Service

Playmobil understands that castle adventures can sometimes lead to lost or damaged pieces. Fortunately‚ Playmobil offers a comprehensive online spare parts service designed for quick and convenient replacements. This service is a lifesaver for maintaining the integrity of your cherished castle sets‚ ensuring uninterrupted play.

Whether you’re missing a tiny flag‚ a crucial castle wall segment‚ or a knight’s shield‚ the Playmobil spare parts service allows you to order individual components directly. This eliminates the frustration of incomplete sets and extends the lifespan of your Playmobil castles;

Finding the correct part is streamlined through detailed diagrams and part numbers. Instructions often reference these numbers‚ making identification easier. The service supports a vast range of sets‚ including older models‚ ensuring that even vintage castles can be restored to their former glory. Maintaining your castle is now simpler than ever!

Playmobil Castle Community Forums & Resources

Playmobil castle enthusiasts are a passionate and resourceful community! Numerous online forums and websites are dedicated to sharing knowledge‚ tips‚ and assistance with all things Playmobil castles. These platforms are invaluable for finding solutions to building challenges and discovering creative modifications.

Dedicated forums often host threads specifically for locating missing instructions‚ identifying parts‚ and discussing building techniques. Members frequently share scanned copies of old manuals and offer advice on sourcing rare components. Beyond troubleshooting‚ these communities foster a vibrant exchange of ideas for expanding and customizing castles.

Websites and social media groups showcase impressive castle creations‚ inspiring builders of all levels. You can find detailed guides on advanced building techniques‚ MOCs (My Own Creations)‚ and even toy photography tips. Connecting with fellow Playmobil fans enhances the enjoyment of this classic toy and provides a wealth of support.

Troubleshooting Common Building Issues

Playmobil castle construction‚ while generally straightforward‚ can sometimes present challenges. A frequent issue is locating the correct placement for smaller pieces – carefully reviewing the PDF instructions is crucial. If parts don’t seem to fit‚ double-check the step number and ensure correct orientation.

Another common problem arises from missing or defective parts. Fortunately‚ Playmobil’s online spare parts service offers a convenient solution for quickly replacing lost components. Before resorting to this‚ thoroughly search the packaging and building area; small pieces often hide easily!

Structural instability can occur‚ particularly with larger castles. Ensure a level building surface and firmly connect all baseplates. Reinforce towers and walls by applying gentle pressure during assembly. If a connection feels loose‚ examine the interlocking mechanism for obstructions. Remember‚ patience and a methodical approach are key to overcoming these hurdles.

fleet enema instructions pdf

Fleet Enema Instructions: A Comprehensive Guide

Fleet (sodium phosphate) enema, supplied by C․B․ Fleet Company Inc, requires careful consideration of contraindications and potential risks, especially regarding electrolyte imbalances․

Excessive dosage can lead to severe dehydration and heart complications; always adhere to label directions to minimize the chance of adverse effects and dependence․

What is a Fleet Enema?

Fleet Enema is a saline solution designed for rectal administration, functioning as a stimulant laxative to quickly empty the bowel․ It contains sodium phosphate, a key ingredient that draws water into the colon, softening stool and stimulating bowel contractions․

Typically available in a pre-filled, single-use container with a disposable rectal tip, Fleet Enema is commonly used for bowel preparation before medical procedures like colonoscopies, or to relieve occasional constipation․ It’s crucial to understand that it’s intended for short-term relief and not a long-term solution․

The enema works by physically stretching the rectum, triggering the urge to defecate, while the sodium phosphate aids in softening and expelling the fecal matter․ Proper usage, adhering to label instructions, is paramount to avoid potential complications․

Understanding the Active Ingredient: Sodium Phosphate

Sodium phosphate, the active ingredient in Fleet Enema, functions as an osmotic laxative․ This means it draws water into the colon from surrounding tissues, increasing the water content of the stool and softening it for easier passage․ Simultaneously, it stimulates bowel contractions, aiding in the evacuation process․

However, this mechanism also carries potential risks․ Excessive sodium phosphate intake can disrupt electrolyte balance, leading to hyperphosphatemia (high phosphate levels), hypocalcemia (low calcium levels), and hypokalemia (low potassium levels)․ These imbalances can affect heart and kidney function․

Individuals with pre-existing kidney problems or those at risk of dehydration are particularly vulnerable to these adverse effects․ Careful adherence to dosage instructions and awareness of potential side effects are crucial when using products containing sodium phosphate․

Preparing for a Fleet Enema

Fleet Enema use necessitates careful patient assessment, considering contraindications, hydration status, and gathering all necessary supplies for safe and effective administration․

Contraindications: Who Should Not Use Fleet Enema

Fleet Enema is not suitable for everyone, and certain individuals should avoid its use due to potential health risks․ Patients with known or suspected gastrointestinal obstruction, or a lack of normal bowel function, are at significant risk and should not utilize this product․

Furthermore, individuals prone to dehydration – particularly those with altered senses or limited fluid intake – should refrain from using Fleet Enema․ Those with existing kidney problems face heightened dangers due to potential electrolyte imbalances․

It’s crucial to avoid use if you experience abdominal pain, nausea, or vomiting before administration․ Always consult a healthcare professional if you have underlying medical conditions or are unsure about its suitability for your specific situation․

Assessing Your Hydration Status

Prior to using a Fleet Enema, carefully evaluate your hydration levels, as dehydration significantly increases the risk of adverse effects, including severe electrolyte imbalances and potential kidney issues․ A simple assessment involves observing your urine color; pale yellow indicates good hydration, while dark yellow suggests dehydration․

Check for signs of thirst, dry mouth, and decreased urination․ Gently pinch the skin on the back of your hand; if it doesn’t quickly return to normal, you may be dehydrated․

Adequate fluid intake is paramount․ Drink plenty of clear liquids, like water or broth, before and after using the enema to maintain proper electrolyte balance and minimize potential complications․ If you suspect dehydration, consult a healthcare professional․

Gathering Necessary Supplies

Before administering a Fleet Enema, ensure you have all necessary supplies readily available for a smooth and comfortable experience․ This includes one unopened Fleet Enema, typically 133mL, and access to a private bathroom․

You’ll also need comfortable disposable gloves, lubricating jelly (water-soluble), and soft toilet paper or wipes․ Having a towel nearby is advisable for cleanup․

Consider a small amount of soap and warm water for handwashing before and after the procedure․ Prepare a comfortable environment, and ensure you won’t be disturbed during administration and retention․ Proper preparation minimizes discomfort and maximizes effectiveness․

Having these items organized beforehand streamlines the process․

Administering a Fleet Enema: Step-by-Step Instructions

Fleet Enema administration involves careful positioning, gentle insertion, controlled solution delivery, and adequate retention time, following label guidance for optimal results and safety․

Positioning for Effective Administration

Proper positioning is crucial for a successful and comfortable Fleet Enema experience․ Begin by lying on your left side, drawing your knees up towards your chest․ This lateral position facilitates the natural progression of the solution through the colon․ Alternatively, a knee-chest position – kneeling with your chest resting on the bed – can also be effective, particularly if lying on your side proves difficult․

Ensure you are relaxed throughout the process․ Tightening your abdominal muscles can hinder the solution’s advancement․ A comfortable and relaxed state allows for optimal bowel evacuation․ Some individuals find it helpful to have a towel or pillow supporting their head for added comfort during the procedure․ Maintaining this position throughout the administration and retention period is vital for maximizing the enema’s effectiveness․

Inserting the Enema Tip

Gentle insertion is paramount to avoid discomfort or injury․ Apply a generous amount of water-based lubricant, such as K-Y Jelly, to the enema tip․ Slowly and carefully insert the tip into your rectum, approximately one to two inches, or until you feel resistance․ Never force the tip; if resistance is encountered, gently rotate the tip while continuing to insert it slowly․

It’s important to remain relaxed during this process․ Once the tip is properly positioned, hold it in place with one hand while preparing to administer the solution․ Ensure a secure, yet comfortable fit to prevent leakage․ The enema tip should be directed towards your navel, following the natural curve of the rectum․ Proper insertion facilitates effective solution delivery and minimizes the risk of complications․

Gentle Administration of the Solution

Once the enema tip is correctly inserted, slowly squeeze the Fleet enema bottle․ Avoid forceful or rapid administration, as this can cause cramping and discomfort․ A gentle, steady flow is crucial for optimal results and patient tolerance․ Monitor your body’s response throughout the process; if you experience significant pain, stop immediately and consult a healthcare professional․

Continue administering the solution until the bottle is empty, or as directed by your healthcare provider or the product label․ Do not exceed the recommended dosage․ Maintaining a relaxed posture will aid in the even distribution of the solution․ Remember, using too much Fleet Enema can have serious consequences, so adherence to instructions is vital․

Retaining the Enema

After complete administration, attempt to retain the Fleet enema solution for as long as comfortably possible – ideally between 5 to 15 minutes, or as instructed․ This allows sufficient time for the solution to stimulate bowel evacuation․ During this period, remain in the chosen position and try to relax your abdominal muscles․

Some discomfort or a feeling of fullness is normal, but severe pain warrants immediate cessation and medical advice․ The urge to defecate will typically arise during this retention phase․ Do not delay when you feel the urge; proceed to the toilet․ Remember, exceeding the recommended dose carries risks, including electrolyte imbalances and potential kidney issues, so follow instructions carefully․

Post-Enema Care and What to Expect

Expect a bowel movement shortly after retention; however, excessive use can cause laxative dependence and electrolyte disturbances, demanding careful monitoring and hydration․

Expected Results and Bowel Movement

Following a Fleet Enema administration, you should anticipate a bowel movement within a relatively short timeframe, typically ranging from fifteen minutes to one hour․ The enema works by stimulating the rectum, encouraging the evacuation of impacted stool․

The initial bowel movement may be accompanied by cramping or a sense of urgency, which is generally normal․ The stool expelled will likely be liquid or semi-formed, and may contain remnants of the enema solution․

It’s important to note that complete evacuation isn’t always guaranteed with a single enema․ If you do not experience a bowel movement within the expected timeframe, or if you feel continued discomfort, consult with a healthcare professional․ Avoid repeated administrations without medical guidance, as this can increase the risk of complications․

Potential Side Effects and When to Seek Medical Attention

Fleet Enema use can cause several side effects, including rectal irritation, cramping, nausea, and bloating․ These are typically mild and resolve on their own․ However, more serious adverse reactions require immediate medical attention․

Be vigilant for signs of dehydration, such as excessive thirst, dizziness, or decreased urination․ Electrolyte imbalances – hyperphosphatemia, hypocalcemia, and hypokalemia – can occur, potentially affecting heart function․ Symptoms include muscle weakness, irregular heartbeat, and confusion․

Seek immediate medical help if you experience severe abdominal pain, vomiting, or any neurological symptoms․ If you suspect an overdose, or if symptoms persist beyond 24 hours, contact a healthcare professional promptly․ Ignoring these warning signs could lead to serious health consequences․

Risks and Complications of Fleet Enema Use

Fleet Enema use carries risks of electrolyte imbalance, dehydration, and potential kidney issues, especially with overuse, leading to laxative dependence and serious complications․

Electrolyte Imbalance: Hyperphosphatemia, Hypocalcemia, Hypokalemia

Fleet enemas, containing sodium phosphate, can significantly disrupt electrolyte balance within the body, posing serious health risks․ Specifically, hyperphosphatemia – elevated phosphate levels – is a common concern, often accompanied by hypocalcemia, a deficiency in calcium․ This occurs because phosphate binds with calcium, reducing available calcium levels․

Furthermore, hypokalemia, or low potassium, can also arise from enema use․ These electrolyte disturbances aren’t merely inconvenient; they can manifest as muscle weakness, irregular heartbeat, and even seizures in severe cases․ Patients with pre-existing kidney problems are particularly vulnerable, as their kidneys may struggle to regulate these electrolyte shifts effectively․ Careful monitoring and adherence to dosage guidelines are crucial to mitigate these risks․

Dehydration and Kidney Issues

Fleet enemas carry a notable risk of dehydration, especially if used improperly or in excessive amounts․ The osmotic effect of sodium phosphate draws water into the colon, potentially depleting overall body fluids․ This dehydration can be particularly dangerous for individuals with compromised kidney function, as the kidneys are responsible for maintaining fluid balance․

The FDA has reported cases of severe dehydration and kidney damage linked to the misuse of Fleet enemas․ Overuse or exceeding the recommended dosage places a significant strain on the kidneys, potentially leading to acute kidney injury․ Patients at risk, including those with altered mental status or limited fluid intake, should exercise extreme caution and consult a healthcare professional before use․

Laxative Dependence and Long-Term Use

Frequent or prolonged use of Fleet enemas can lead to laxative dependence, where the bowel loses its natural ability to function independently․ This occurs as the colon becomes reliant on the stimulant effect of the enema to initiate bowel movements․ Over time, this can result in chronic constipation and a diminished response to normal dietary fiber and lifestyle interventions․

The medication’s instructions explicitly warn against regular use, emphasizing the potential for this dependence․ Individuals who find themselves needing Fleet enemas repeatedly should investigate the underlying cause of their constipation and seek medical advice․ Breaking the cycle of dependence often requires a comprehensive approach, including dietary changes, increased hydration, and potentially, medical management․

Dosage and Overdose Information

Fleet Enema requires precise adherence to label instructions; exceeding the recommended dose can cause rare, life-threatening effects on the kidneys and heart․

Following Label Instructions Precisely

Fleet Enema’s effectiveness and safety are directly linked to strict adherence to the provided label instructions․ Never exceed the recommended dosage, as doing so significantly elevates the risk of severe adverse effects․ The FDA has issued warnings regarding instances of serious dehydration and dangerous electrolyte shifts resulting from overuse․

Carefully read and understand all directions before administration․ Pay close attention to the specified volume and frequency of use․ Using more than directed doesn’t enhance effectiveness and dramatically increases the potential for complications, including hyperphosphatemia, hypocalcemia, and hypokalemia․

This medication is intended for short-term relief and should not be used regularly to prevent constipation, as this can lead to laxative dependence․ Always consult a healthcare professional if constipation persists or worsens․

Recognizing Symptoms of an Overdose

Overdosing on Fleet Enema can manifest in several concerning ways, demanding immediate medical attention․ Symptoms of an overdose include, but aren’t limited to, severe dehydration, characterized by excessive thirst, decreased urination, and dizziness․ Electrolyte imbalances, specifically hyperphosphatemia, can cause muscle weakness, numbness, or tingling․

Cardiac irregularities, such as an irregular heartbeat, are also potential indicators of a serious overdose․ Individuals may experience nausea, vomiting, and abdominal cramping․ In severe cases, kidney problems can develop, leading to swelling in the ankles or feet․

If you suspect an overdose, seek emergency medical help immediately․ Prompt intervention is crucial to mitigate potential life-threatening complications arising from electrolyte disturbances and dehydration․

Fleet Enema and Specific Patient Populations

Fleet Enema use requires caution in elderly patients and those with kidney issues due to increased dehydration risk and electrolyte disturbance potential․

Use in Elderly Patients

Fleet Enema administration in elderly individuals necessitates heightened awareness and careful monitoring due to several age-related physiological changes․ Older adults are often more susceptible to dehydration, and Fleet Enema, containing sodium phosphate, can exacerbate this risk․ Their renal function may be diminished, hindering the effective excretion of phosphate, potentially leading to hyperphosphatemia and associated electrolyte imbalances like hypocalcemia․

Furthermore, elderly patients may have altered senses or reduced fluid intake, compounding the dehydration risk․ Pre-existing cardiac conditions can also be negatively impacted by electrolyte shifts․ Therefore, a thorough assessment of hydration status and renal function is crucial before considering Fleet Enema use in this population․ Lower doses and diligent post-enema monitoring are strongly advised․

Use in Patients with Kidney Problems

Fleet Enema use is profoundly contraindicated, or requires extreme caution, in patients with pre-existing kidney problems․ The active ingredient, sodium phosphate, is primarily eliminated by the kidneys; impaired renal function significantly hinders this process, leading to phosphate retention and potentially life-threatening hyperphosphatemia․ This electrolyte imbalance can disrupt calcium levels, causing hypocalcemia, and also impact potassium, resulting in hypokalemia․

These electrolyte disturbances can manifest as cardiac arrhythmias and other severe complications․ Individuals with known or suspected kidney disease should absolutely avoid Fleet Enema․ Even mild renal impairment warrants careful consideration and, ideally, alternative bowel preparation methods․ Prior assessment of kidney function is paramount to prevent adverse outcomes․

the president special instructions

The President’s Special Instructions: A Historical Overview

Following a pivotal decision, Counsel to the President, John W; Dean III, tasked Fry and Fulton with meticulously managing sensitive White House materials,
establishing a system for indexing and filing crucial documents with specific criteria.

These special files encompassed twelve distinct categories, including investigative reports, position applications, and documents containing potentially damaging remarks
about individuals’ character, loyalty, or professional capabilities.

The implementation of these instructions marked a significant step in preserving and controlling access to highly confidential presidential records,
shaping the landscape of White House information management for years to come.

Origins and Establishment of Special Files

The genesis of the “Special Files” system within the Nixon White House stemmed from a growing concern regarding the handling of sensitive information and the potential for damaging leaks. Following the Watergate scandal’s unfolding, President Nixon sought a more controlled and secure method for managing documents pertaining to staff activities, investigations, and potentially controversial matters.

Initially, the impetus for establishing these files arose from the need to safeguard information relevant to legal defense and to maintain a degree of confidentiality surrounding internal White House operations. The decision wasn’t formalized through a specific executive order or directive, but rather evolved as a practical response to the escalating crisis.

John W. Dean III, as Counsel to the President, played a central role in conceptualizing and implementing the system. He recognized the necessity for a dedicated process to receive, index, and file materials deemed particularly sensitive, laying the groundwork for what would become the Special Files. This initial framework aimed to centralize control and ensure accountability in the handling of crucial presidential records.

John W. Dean III and the Implementation of Special Files

As Counsel to President Nixon, John W. Dean III was instrumental in the practical implementation of the Special Files system. He didn’t merely conceive of the idea, but actively directed the process, assigning specific responsibilities to White House staff members, notably Fry and Fulton. Their task was clearly defined: to receive all sensitive materials originating from White House personnel, meticulously index each item, and then file it within the newly established Special Files.

Dean provided Fry and Fulton with a detailed set of criteria to guide their determinations regarding inclusion within the Special Files. This wasn’t a blanket directive to collect everything, but a nuanced approach focused on materials deemed particularly sensitive or potentially damaging. His involvement ensured a degree of consistency and control over what was ultimately preserved within these confidential records.

Effectively, Dean acted as the architect of the system, translating the initial need for secure document management into a functioning operational procedure. His leadership was crucial in establishing the Special Files as a central repository for sensitive White House information.

Criteria for Inclusion in Special Files

The establishment of Special Files wasn’t arbitrary; specific criteria dictated which documents warranted their heightened security and controlled access. These guidelines, developed under John W. Dean III’s direction, categorized twelve distinct types of materials for inclusion. Notably, investigative reports concerning individuals were prioritized, alongside applications and recommendations for key positions within the administration.

Documents containing potentially damaging information – derogatory remarks about character, loyalty, integrity, or professional ability – were also flagged for inclusion. This reflected a concern for protecting the reputations of individuals under scrutiny, as well as safeguarding the administration from potential vulnerabilities. The criteria extended to materials relating to sensitive policy debates and internal White House deliberations.

Essentially, the criteria aimed to capture any document that could pose a legal, political, or reputational risk if publicly disclosed. This proactive approach to document management underscored the administration’s awareness of the potential consequences of information leaks.

Investigative Reports on Individuals

Investigative reports concerning individuals represented a significant category within the Special Files, reflecting the White House’s need to vet personnel and address potential security risks. These reports encompassed a wide range of inquiries, from background checks on prospective appointees to investigations into allegations of misconduct by current staff members. The inclusion of such reports wasn’t merely about due diligence; it was about protecting the integrity of the administration.

Sensitive information contained within these files often included details about personal finances, past associations, and potential vulnerabilities that could be exploited. Maintaining strict control over access to these reports was paramount, given the potential for damage to reputations and careers. The Special Files ensured that this information remained confidential, accessible only to those with a legitimate need to know.

Furthermore, these reports provided a crucial record for responding to potential crises and managing public perception.

Position Applications and Recommendations

Position applications and recommendations formed a core component of the Special Files, meticulously documenting the vetting process for key White House appointments. These files weren’t simply repositories of resumes; they contained detailed assessments of candidates’ qualifications, political affiliations, and potential suitability for sensitive roles. The inclusion criteria prioritized a comprehensive understanding of each applicant’s background and character.

Recommendations from trusted advisors, members of Congress, and other influential figures were also carefully preserved, offering valuable insights into candidates’ strengths and weaknesses. These recommendations often included candid evaluations of an individual’s loyalty, integrity, and ability to handle the pressures of public service. The Special Files ensured that these perspectives were readily available to decision-makers.

Ultimately, this collection provided a historical record of the appointment process, demonstrating the diligence and care taken in selecting personnel.

Documents with Derogatory Remarks

A significant, and often sensitive, category within the Special Files comprised documents containing derogatory remarks concerning individuals. These weren’t limited to formal accusations; they included memos, letters, and even informal notes expressing concerns about a person’s character, loyalty, integrity, or professional ability. The purpose of collecting such materials wasn’t necessarily to condemn, but to provide a complete picture of potential risks associated with individuals under consideration.

Such documentation allowed decision-makers to assess potential vulnerabilities and make informed judgments about appointments or interactions. The inclusion of these remarks, however, was subject to careful scrutiny, ensuring that the information was relevant and credible. It was crucial to balance the need for transparency with the protection of individual reputations.

This practice highlights the complex ethical considerations inherent in maintaining presidential records.

Types of Presidential Directives

Presidents utilize various directives – executive orders, proclamations, and memoranda – to shape policy and guide the executive branch,
establishing clear instructions for federal agencies and personnel.

Executive Orders

Executive Orders represent a powerful tool wielded by the President, functioning as directives that manage operations of the federal government.
These orders are rooted in the President’s inherent authority to oversee the executive branch and are legally binding, carrying the force of law.
Unlike legislation passed by Congress, Executive Orders do not require congressional approval, allowing for swift implementation of presidential policy.

However, Executive Orders are subject to judicial review and can be struck down if deemed to exceed the President’s constitutional authority.
Historically, they have been employed to address a wide range of issues, from national security concerns to economic regulations and administrative procedures.
The scope and impact of an Executive Order can be substantial, influencing the lives of millions of Americans and shaping the direction of government policy.

Furthermore, subsequent presidents can easily modify or revoke prior Executive Orders, leading to policy shifts with each change in administration.

Proclamations

Presidential Proclamations are official statements issued by the President to manage ceremonies, observances, or to declare a state of emergency.
Distinct from Executive Orders, Proclamations often commemorate events, recognize achievements, or establish national days of remembrance. They hold legal authority,
though generally less expansive than Executive Orders, and don’t require Congressional approval for issuance.

Historically, Proclamations have been utilized to address critical national situations, such as declaring national emergencies or adjusting tariffs.
They can also be employed to designate national monuments, reserves, or other protected areas, impacting land management and conservation efforts.
The power to issue Proclamations stems from the President’s constitutional role as Commander-in-Chief and chief executive.

Like Executive Orders, Proclamations are subject to judicial review and can be challenged if they overstep constitutional boundaries.

Presidential Memoranda

Presidential Memoranda represent a crucial form of presidential communication, serving as directives to executive branch officials. These documents, less formal than Executive Orders or Proclamations, guide policy implementation and clarify existing regulations. They don’t require Congressional approval and are primarily intended for internal government use, though some are released publicly.

Memoranda can address a wide range of issues, from administrative procedures to policy priorities. They often request reports, initiate studies, or establish working groups to tackle specific challenges. The legal weight of a memorandum is generally less than that of an Executive Order, but they still carry significant authority within the executive branch.

Distinguishing between internal and public memoranda is key; the latter signals a policy direction to the broader public and stakeholders.

Internal Presidential Memoranda

Internal Presidential Memoranda function as direct communications within the Executive Branch, shaping policy and operational procedures without public disclosure. These documents, often originating from the President or senior staff, instruct agencies on specific actions, request detailed reports, or initiate internal reviews. They are vital for coordinating governmental responses to emerging issues and ensuring consistent implementation of presidential directives.

Unlike public memoranda, internal versions prioritize efficient administration and confidential deliberation. They may contain sensitive information, preliminary assessments, or strategic considerations not intended for external scrutiny. Their authority stems from the President’s executive power and the hierarchical structure of the federal bureaucracy.

Effectively, these memoranda are the President’s means of managing the vast machinery of government, ensuring alignment with their policy goals.

Public Presidential Memoranda

Public Presidential Memoranda represent a direct line of communication between the President and the American public, outlining policy decisions, announcing initiatives, or responding to national events. These documents, released for public consumption, serve as a crucial tool for shaping public opinion and demonstrating presidential leadership. They differ significantly from internal memoranda, prioritizing transparency and public accountability.

Often, these memoranda detail the rationale behind specific policies, explain the intended benefits, and address potential concerns. They can also be used to commemorate significant occasions, honor individuals, or express condolences. Their publication ensures citizens are informed about the President’s actions and the reasoning behind them.

Ultimately, public presidential memoranda are a cornerstone of democratic governance, fostering a more informed and engaged citizenry.

Controversial Presidential Actions

Occasionally, presidential actions, like signing statements, spark debate when a President declares intent to disregard provisions deemed unconstitutional,
or directs enforcement through agency commentary.

These statements can significantly impact law enforcement and raise constitutional challenges, becoming focal points of legal and political contention.

Signing Statements

Signing statements, issued upon signing a bill into law, represent a unique presidential tool with a complex history and often, considerable controversy. While seemingly a formality, these statements allow the President to express their interpretation of the legislation, sometimes asserting the right to selectively enforce or even disregard provisions deemed unconstitutional.

This power, not explicitly granted by the Constitution, has been utilized by presidents across the political spectrum, leading to accusations of overreach and undermining the legislative process. Critics argue that signing statements effectively allow presidents to amend laws without congressional approval, violating the separation of powers principle. Conversely, proponents maintain they are a legitimate means of defending constitutional principles and ensuring faithful execution of the law.

The debate centers on the extent to which a President can legitimately challenge the constitutionality of a law after it has been passed by Congress and signed into law. Presidential signing statements can be found readily available for public review, adding to the ongoing discussion surrounding their use and impact.

Constitutional Challenges and Signing Statements

Constitutional challenges to presidential signing statements frequently arise when a President declares an intent to ignore provisions believed unconstitutional. These challenges often center on the separation of powers, arguing the President’s actions usurp Congress’s legislative authority. Courts have grappled with defining the permissible scope of these statements, balancing presidential authority with congressional prerogatives.

Legal scholars debate whether signing statements constitute “legislative vetoes” – actions that effectively overturn congressional decisions – or legitimate interpretations of existing law. The American Bar Association, among others, has expressed concern over the potential for abuse, advocating for greater transparency and restraint in their use.

Historically, lawsuits have been filed seeking to invalidate signing statements, but courts have often avoided direct rulings, citing political question doctrine or lack of standing. The ongoing tension highlights the delicate balance between presidential power and constitutional limitations, fueling continued debate and scrutiny.

Impact of Signing Statements on Law Enforcement

Presidential signing statements can significantly impact law enforcement by directing agencies on how to interpret and enforce newly enacted laws. When a President expresses reservations about a law’s constitutionality, agencies may receive guidance to prioritize certain provisions or disregard others, potentially altering enforcement priorities.

This guidance, while not legally binding like a statute, carries substantial weight, influencing how federal agents and prosecutors approach investigations and prosecutions. Critics argue this creates uncertainty and undermines the rule of law, as enforcement becomes subject to presidential discretion rather than clear legislative intent.

Conversely, supporters contend signing statements clarify presidential understanding and ensure laws are implemented consistent with constitutional principles. However, the lack of transparency surrounding these statements often fuels concerns about potential abuses and selective enforcement, impacting public trust in the justice system.

Historical Context of Presidential Instructions

Throughout history, presidential directives have shaped U.S. policy, from Cold War strategies to climate change diplomacy, and responses to terrorism,
reflecting evolving national priorities and global challenges.

These instructions, encompassing foreign policy and intelligence operations, demonstrate a consistent pattern of presidential leadership and influence
over critical aspects of governance and national security.

U.S. Foreign Policy in the Carter Years (1977-1981)

During the Carter administration, the management of presidential instructions, including those related to foreign policy, operated within the framework established by the Special Files system.
Highest-level memos to the President, detailing critical policy decisions and sensitive intelligence assessments, were subject to careful documentation and control.

These memos, often containing classified information, reflected the complex challenges of the era, such as the Iran hostage crisis, the Soviet-Afghan War, and the pursuit of
Middle East peace. The Special Files ensured that a comprehensive record of these deliberations was maintained, providing a historical account of the decision-making process.

The meticulous indexing and filing of these documents, overseen by figures like John W. Dean III’s appointed staff, facilitated access for authorized personnel while safeguarding
sensitive information from unauthorized disclosure. This system underscored the importance of transparency and accountability in the formulation and execution of U.S. foreign policy.

U.S. Climate Change Diplomacy (1981-2015)

Throughout this period, presidential directives concerning climate change – from initial considerations of the Montreal Protocol to the negotiations leading to the Paris Agreement –
were managed under the established protocols for sensitive White House materials, including the Special Files system.

Documents detailing policy proposals, scientific assessments, and international negotiations were meticulously indexed and filed, reflecting the evolving U.S. stance on climate
change. These records captured the internal debates and external pressures shaping American diplomacy on this critical issue.

The Special Files ensured that a comprehensive historical record was maintained, documenting the progression of U.S. climate policy across multiple administrations.
This system facilitated informed decision-making and provided a valuable resource for future policymakers grappling with the challenges of a changing climate;

U.S. Espionage and Intelligence (1947-1996)

Regarding U.S. espionage and intelligence operations spanning 1947-1996, presidential directives and related documentation were subject to the stringent protocols
governing the Special Files. Highly classified reports, intelligence assessments, and policy memoranda concerning covert actions were meticulously cataloged.

These sensitive materials, detailing operations and analyses, were handled with the utmost discretion, adhering to the established criteria for inclusion in the
Special Files. The system ensured secure storage and restricted access, safeguarding national security information.

The meticulous record-keeping facilitated oversight and accountability, while also preserving a comprehensive historical account of U.S. intelligence activities
during the Cold War and its aftermath, all managed under the President’s special instructions.

Soviet-U.S. Relations and the End of the Cold War (1985-1991)

During the pivotal years of 1985-1991, as Soviet-U.S. relations underwent a dramatic transformation, presidential directives related to these interactions
were meticulously documented within the Special Files system. Sensitive communications, policy memos, and intelligence assessments concerning arms control,
diplomacy, and the evolving political landscape in the Soviet Union were carefully cataloged.

These materials, reflecting the high-stakes nature of the Cold War’s final years, were subject to the stringent criteria established for inclusion in the
Special Files, ensuring secure storage and restricted access. The system facilitated informed decision-making and historical preservation.

The President’s special instructions guaranteed a comprehensive record of this crucial period, documenting the complex negotiations and strategic shifts
that ultimately led to the end of the Cold War.

Resources for Accessing Presidential Documents

GovInfo, HathiTrust, and the GPO offer invaluable access to official presidential publications, including documents originating from special instructions and directives.

These resources provide researchers and the public with opportunities to explore the historical record and gain insights into presidential actions.

GovInfo: Official Publications from All Branches

GovInfo, a service of the United States Government Publishing Office (GPO), stands as a cornerstone for accessing official publications from all three branches of the Federal Government – Legislative, Executive, and Judicial.

As a Federal agency within the legislative branch, the GPO ensures free public access to a vast collection of governmental information, including presidential directives and related documentation stemming from special instructions.

The platform’s coverage extends from 1993 to the present day, encompassing the presidencies of George H.W. Bush and all subsequent administrations, offering a comprehensive archive for researchers and citizens alike.

Users can navigate through a wealth of materials, including executive orders, proclamations, and presidential memoranda, potentially uncovering insights into the implementation and evolution of special instructions over time.

GovInfo’s user-friendly interface and robust search capabilities facilitate efficient exploration of presidential records, making it an indispensable resource for understanding the intricacies of presidential governance.

HathiTrust: Public Papers of the Presidents

HathiTrust serves as a vast digital repository, offering public access to the Public Papers of the Presidents of the United States, a crucial resource for understanding presidential actions and directives, including those related to special instructions.

This collaborative initiative, involving numerous academic and research institutions, provides digitized versions of official presidential materials, enabling researchers to explore the historical context of executive decision-making.

Researchers can delve into the Public Papers to trace the evolution of presidential instructions, examining how they were articulated, implemented, and responded to over time, gaining valuable insights into the inner workings of the White House.

The collection encompasses a wide range of presidential documents, offering a comprehensive view of presidential communications and policy initiatives, potentially revealing the rationale behind special instructions.

HathiTrust’s full-text search capabilities allow users to pinpoint specific references to special instructions or related topics, facilitating in-depth analysis of presidential governance and historical trends.

GPO (Government Publishing Office)

The Government Publishing Office (GPO) stands as a vital federal agency within the legislative branch, dedicated to providing public access to official government publications, including those pertaining to presidential directives and special instructions.

As the official publisher for the federal government, GPO ensures the dissemination of presidential documents, such as executive orders, proclamations, and memoranda, offering a comprehensive record of presidential actions.

Through its GovInfo service, GPO offers free online access to a wealth of government information, enabling researchers and citizens to explore presidential records and gain insights into policy-making processes.

Researchers investigating presidential special instructions can utilize GPO’s resources to locate relevant documents, track their publication history, and analyze their impact on government operations.

GPO’s commitment to transparency and accessibility makes it an indispensable resource for understanding the complexities of presidential governance and the evolution of executive power.

Specific Case Studies

Examining instances like Bush’s South Africa policy, Iraq’s war and occupation, and U.S. responses to terrorism reveals how presidential instructions shaped critical decisions and outcomes.

These case studies demonstrate the practical application of special directives, highlighting their influence on foreign policy, national security, and domestic affairs.

Bush Administration and South Africa Policy (1962-1989)

The Bush Administration’s approach to South Africa, spanning from 1962 to 1989, provides a compelling case study in the application of presidential instructions regarding foreign policy.

Initial policies leaned towards a pragmatic engagement with the apartheid regime, prioritizing strategic interests during the Cold War and economic ties, despite growing international condemnation.

However, internal memos and documented deliberations – potentially residing within the Special Files – reveal evolving perspectives and increasing pressure to adopt a stronger stance against apartheid.

Presidential directives, likely communicated through memoranda and influenced by intelligence reports, gradually shifted the U.S. position towards constructive engagement, advocating for reforms within South Africa.

These instructions influenced diplomatic efforts, economic sanctions, and public statements, ultimately contributing to the dismantling of apartheid and the transition to a democratic South Africa.

Analyzing the documentation from this period, including any records within the Special Files, offers valuable insights into the complexities of presidential decision-making and the impact of internal guidance.

Targeting Iraq: War and Occupation (2004-2011)

The period of 2004-2011, encompassing the Iraq War and subsequent occupation, likely generated a substantial volume of sensitive documentation subject to presidential instructions.

Presidential directives concerning military operations, reconstruction efforts, and counter-insurgency strategies would have been meticulously recorded and potentially filed within the Special Files.

Internal memoranda detailing policy debates, intelligence assessments, and legal justifications for actions in Iraq would have been crucial components of this record.

Investigative reports on alleged abuses by U.S. forces or Iraqi security forces, as well as applications for key positions within the occupation government, would also fall under these instructions.

Documents containing derogatory remarks about individuals involved in the conflict, both allies and adversaries, would have been carefully managed and archived.

Examining these records, if accessible, could illuminate the decision-making processes and internal deliberations that shaped U.S. policy during this tumultuous period.

Terrorism and U.S. Policy (1968-2002)

From 1968 to 2002, the evolving threat of terrorism significantly impacted U;S. policy, generating a wealth of classified information subject to presidential control.

Presidential instructions regarding counterterrorism measures, intelligence gathering, and responses to terrorist attacks would have necessitated careful documentation.

Internal memos detailing policy discussions, legal interpretations of authorities, and assessments of terrorist groups would have been central to these files.

Investigative reports on terrorist incidents, including those targeting U.S. interests abroad, and vetting processes for personnel involved in counterterrorism efforts, would be included.

Documents containing sensitive information about individuals suspected of terrorist ties, or critical assessments of foreign governments’ counterterrorism efforts, would be carefully archived.

Analyzing these records could reveal the evolution of U.S. counterterrorism strategy and the internal debates surrounding policy choices during this critical period.

opalescence 20 instructions pdf

Opalescence 20 Instructions PDF: A Comprehensive Guide

Opalescence PF whitening is now Opalescence Custom take-home whitening‚ offering detailed instructions for use and safety data sheets readily available as a PDF.

This comprehensive guide details the Opalescence 20 system‚ covering preparation‚ application‚ wearing time‚ and post-treatment care‚ all accessible in a downloadable PDF.

Opalescence 20 represents a leading professional teeth whitening system‚ now rebranded as Opalescence Custom for convenient at-home use. This system utilizes a carbamide peroxide gel‚ available in varying concentrations‚ to effectively brighten smiles. Understanding the nuances of this product‚ including proper application and safety guidelines‚ is crucial for achieving optimal results.

The availability of a detailed Opalescence 20 Instructions PDF is paramount‚ providing dental professionals and patients alike with a readily accessible resource. This guide encompasses everything from initial preparation – brushing teeth and adapting trays – to the recommended wearing time‚ typically ranging from two to four hours daily.

Furthermore‚ the PDF outlines essential post-treatment care and crucial safety precautions‚ including managing potential sensitivity and addressing gum irritation. It’s a vital tool for ensuring a safe and successful whitening experience‚ transforming your smile with confidence and clarity.

What is Opalescence 20?

Opalescence 20 is a teeth whitening gel formulated with 20% carbamide peroxide‚ designed for use with custom-fitted trays. It’s a popular choice for achieving noticeable whitening results while minimizing tooth sensitivity‚ a key concern for many patients. The Opalescence 20 Instructions PDF details the precise composition and intended use of this product.

Unlike over-the-counter whitening options‚ Opalescence 20 is professionally dispensed and requires a dentist’s supervision. The gel is applied directly into custom trays created from impressions of your teeth‚ ensuring optimal contact and even distribution. The PDF provides guidance on the correct amount of gel to use per tray compartment – typically a small drop.

This system allows for controlled whitening‚ with treatment durations varying based on individual needs and sensitivity levels‚ as clearly outlined within the comprehensive instructions PDF. It’s a reliable and effective method for brightening smiles under professional guidance.

Key Features of Opalescence 20

The Opalescence 20 Instructions PDF highlights several key features that contribute to its effectiveness and patient comfort. Primarily‚ the 20% carbamide peroxide concentration strikes a balance between potent whitening and reduced sensitivity‚ making it suitable for a wider range of users. The gel’s viscosity ensures it stays securely within the custom trays‚ minimizing leakage and maximizing contact with tooth surfaces.

Another significant feature is its compatibility with both day and night wear schedules‚ offering flexibility based on individual preferences and dentist recommendations – details found within the PDF. The formula also includes potassium nitrate‚ a desensitizing agent‚ further mitigating potential discomfort.

Opalescence 20 is designed for use with custom trays‚ providing a precise fit and even gel distribution‚ crucial for consistent results. The downloadable PDF provides comprehensive guidance on tray adaptation and proper gel application techniques.

Understanding the Opalescence 20 System

The Opalescence 20 Instructions PDF details a take-home whitening system utilizing custom trays and a 20% carbamide peroxide gel for effective results.

Components of the Opalescence 20 Kit

Opalescence 20 kits‚ as detailed in the Instructions for Use PDF‚ typically include several essential components for a successful teeth whitening experience. Primarily‚ you’ll find syringes containing the Opalescence 20 regular carbamide peroxide whitening gel‚ usually 1.2ml per syringe. These syringes are designed for precise application into the custom-fitted trays.

Speaking of trays‚ the kit necessitates either custom-made trays created by a dental professional‚ or‚ less commonly‚ stock trays. The PDF emphasizes the superior fit and effectiveness of custom trays. Additionally‚ the Opalescence system often includes a patient instruction leaflet‚ providing guidance on usage and safety. Some kits may also contain a tray storage case to maintain hygiene and protect the trays. Finally‚ the PDF highlights the importance of consulting the included materials for specific component variations.

Carbamide Peroxide Concentration & Its Impact

The Opalescence 20 Instructions PDF clearly outlines the significance of the 20% carbamide peroxide concentration. This level is generally considered effective for many patients seeking noticeable whitening results‚ balancing efficacy with manageable sensitivity. Carbamide peroxide works by releasing hydrogen peroxide‚ the active whitening agent‚ which penetrates the enamel to break down stains.

The PDF details how higher concentrations‚ like Opalescence 35%‚ offer faster results but potentially increase sensitivity. Conversely‚ lower concentrations require longer treatment durations. Opalescence 20 strikes a balance‚ typically requiring wear times of 2 to 4 hours daily. The PDF emphasizes that individual responses vary‚ and following the recommended guidelines is crucial. Understanding this concentration’s impact‚ as detailed in the PDF‚ allows for informed decisions and optimized whitening outcomes.

Custom Trays vs. Stock Trays

The Opalescence 20 Instructions PDF strongly advocates for custom-fitted trays for optimal whitening results. Unlike stock trays‚ which are one-size-fits-all‚ custom trays are fabricated from impressions of your teeth‚ ensuring a precise and comfortable fit. This close adaptation minimizes gel leakage and maximizes contact between the whitening agent and tooth surfaces.

The PDF explains that stock trays often allow gel to spill into the gums‚ potentially causing irritation. Custom trays significantly reduce this risk‚ leading to a more comfortable experience. While stock trays are a more affordable option‚ the PDF highlights that custom trays deliver superior whitening efficacy and safety. Investing in custom trays‚ as detailed within the Opalescence 20 PDF‚ is crucial for achieving predictable and consistent whitening outcomes.

Step-by-Step Instructions for Use

The Opalescence 20 Instructions PDF guides users through preparation‚ gel application‚ wearing time‚ and post-treatment care for effective whitening.

Preparation Before Whitening

Prior to initiating the Opalescence 20 whitening process‚ meticulous preparation is crucial for optimal results and minimized sensitivity. The Opalescence 20 Instructions PDF emphasizes a thorough dental check-up to address any existing cavities or gum disease‚ as whitening can exacerbate these issues.

Brush your teeth thoroughly before each whitening session‚ ensuring a clean surface for the gel to adhere to effectively. Gently tap the custom trays to ensure a snug and comfortable fit against your teeth‚ adapting the tray sides for maximum gel contact.

It’s also recommended to avoid consuming staining substances like coffee‚ tea‚ red wine‚ and tobacco products during the whitening period. Following these preparatory steps‚ as detailed in the PDF‚ will significantly enhance the efficacy and comfort of your Opalescence 20 treatment.

Applying the Opalescence 20 Gel

The Opalescence 20 Instructions PDF provides clear guidance on gel application‚ emphasizing precision for effective whitening. Begin by ensuring your custom trays are clean and dry. Carefully dispense a small drop of Opalescence 20 gel into each compartment of the tray‚ avoiding overfilling‚ which can lead to gel leakage and gum irritation.

A pea-sized amount is generally sufficient for each tooth impression. Ensure the gel evenly coats the inner surface of the tray‚ reaching all areas intended for whitening. Avoid contact with the gums as much as possible during application.

The PDF highlights the importance of using the correct amount of gel to maximize results while minimizing potential side effects. Proper application‚ as detailed in the instructions‚ is key to a successful Opalescence 20 whitening experience.

Wearing Time & Duration

The Opalescence 20 Instructions PDF clearly outlines recommended wearing times‚ crucial for achieving optimal whitening results and minimizing sensitivity. Generally‚ with Opalescence 20‚ trays are worn for 2 to 4 hours daily‚ as specified in the provided documentation.

Consistent use within this timeframe is vital; however‚ individual dental professionals may adjust the duration based on specific needs and tooth sensitivity. The PDF emphasizes that exceeding the recommended wearing time does not necessarily accelerate whitening and can increase the risk of discomfort.

Treatment duration typically ranges from 10 to 14 days‚ but this can vary. Following the guidelines in the Opalescence 20 Instructions PDF ensures a safe and effective whitening journey‚ tailored to your individual requirements.

Post-Treatment Care

The Opalescence 20 Instructions PDF details essential post-treatment care to maintain your brighter smile and minimize potential sensitivity. Immediately after removing the trays‚ rinsing your mouth with cool water is recommended to remove any residual gel.

Avoid consuming staining substances like coffee‚ red wine‚ and dark-colored foods for at least 24-48 hours post-treatment‚ as teeth are more porous during this period. The PDF suggests using a fluoride toothpaste to help remineralize enamel and reduce sensitivity.

If sensitivity occurs‚ the Opalescence 20 Instructions PDF advises using a desensitizing toothpaste or temporarily reducing wearing time. Regular dental check-ups are crucial to monitor results and maintain optimal oral health following whitening.

Safety Precautions & Potential Side Effects

The Opalescence 20 Instructions PDF highlights precautions‚ including sensitivity management‚ gum irritation guidance‚ and specific warnings for pregnant or breastfeeding individuals.

Sensitivity Management

Opalescence 20 Instructions PDF documents emphasize that tooth sensitivity is a common‚ temporary side effect during whitening; To manage this‚ the PDF recommends using a desensitizing toothpaste containing potassium nitrate for several weeks before‚ during‚ and after treatment;

If sensitivity occurs‚ reducing the wearing time of the trays – perhaps from four hours to two‚ or even one – is advised. A break from whitening for a few days can also provide relief. The PDF suggests avoiding extremely hot or cold foods and beverages‚ as these can exacerbate sensitivity.

Furthermore‚ the instructions detail that if sensitivity persists beyond a manageable level‚ a dentist should be consulted. They may recommend a fluoride treatment or other interventions to alleviate discomfort and allow continuation of the whitening process. Proper tray fit‚ as detailed in the PDF‚ also minimizes gel contact with sensitive areas.

Gum Irritation & How to Address It

The Opalescence 20 Instructions PDF acknowledges that gum irritation can occur if the whitening gel comes into contact with soft tissues. Proper tray fit is crucial to prevent this‚ as ill-fitting trays allow gel leakage. If irritation develops‚ the PDF advises immediately removing the trays and rinsing the mouth thoroughly with water.

Temporary discomfort is common‚ but persistent or severe irritation warrants attention. The instructions recommend discontinuing use until the gums heal. Applying a cool compress to the affected area can help reduce inflammation.

The PDF stresses the importance of avoiding overfilling the trays‚ as excess gel is more likely to contact the gums. If irritation continues‚ consulting a dental professional is advised; they may suggest a protective barrier or alternative treatment strategies. Maintaining good oral hygiene throughout the process is also key.

Precautions for Pregnant/Breastfeeding Women

The Opalescence 20 Instructions PDF explicitly states that the safety of using the product during pregnancy and breastfeeding has not been established. Therefore‚ the PDF strongly recommends that pregnant or breastfeeding women postpone teeth whitening treatment until after they have finished breastfeeding.

This precaution is due to the limited research on the potential effects of carbamide peroxide on fetal development or infant health through breast milk. While topical application minimizes systemic absorption‚ erring on the side of caution is paramount.

The PDF emphasizes that a dentist should always be consulted before initiating any whitening regimen during these periods. Alternative cosmetic dental options may be discussed‚ prioritizing both maternal and infant well-being. It’s crucial to avoid any unnecessary risks during pregnancy and lactation.

Troubleshooting Common Issues

The Opalescence 20 Instructions PDF addresses concerns like uneven results‚ gel leakage‚ and prolonged sensitivity‚ offering solutions for optimal whitening experiences.

Uneven Whitening Results

Opalescence 20 Instructions PDF resources detail that achieving uniform whitening often depends on consistent gel application within the trays. Ensure each tooth compartment receives an adequate‚ yet not excessive‚ amount of gel for optimal contact.

If unevenness persists‚ the PDF suggests verifying proper tray fit; ill-fitting trays can lead to inconsistent gel distribution. Consider consulting your dental professional for tray adjustments or potential refinements to your whitening technique. Factors like existing dental work‚ such as fillings or crowns‚ may also influence whitening outcomes‚ as these materials do not respond to bleaching agents.

The PDF emphasizes that individual tooth variations and enamel density can contribute to differing levels of whitening. Patience and adherence to the recommended treatment duration are crucial for maximizing results.

Gel Leakage from Trays

The Opalescence 20 Instructions PDF acknowledges that minor gel leakage can occur‚ particularly during initial uses. It advises using a small amount of gel – a thin‚ even layer – within each tray compartment to minimize overflow. Avoid overfilling‚ as this significantly increases the risk of leakage and potential gum irritation.

If leakage persists‚ the PDF recommends re-evaluating tray fit. Trays that are too loose or don’t adapt closely to the teeth are prone to leakage. Consult your dentist for tray adjustments if necessary. Lightly tapping the tray against your teeth after insertion can help ensure a snug fit and reduce gaps.

The document also suggests wiping away any excess gel that escapes the trays with a clean‚ damp cloth to prevent irritation.

Prolonged Sensitivity

The Opalescence 20 Instructions PDF addresses prolonged tooth sensitivity as a potential side effect‚ advising users to discontinue use and consult their dentist if discomfort persists beyond a few days. It recommends using desensitizing toothpastes containing potassium nitrate before‚ during‚ and after treatment to help mitigate sensitivity.

The PDF suggests reducing wearing time or temporarily pausing treatment if sensitivity becomes bothersome. Shorter application durations‚ such as one to two hours instead of the full recommended time‚ can lessen discomfort. Reintroducing treatment gradually can also help teeth acclimate.

Furthermore‚ the document emphasizes maintaining good oral hygiene and avoiding extremely hot or cold foods and beverages during whitening to minimize sensitivity flare-ups.

Finding the Opalescence 20 Instructions PDF

Access the Opalescence 20 Instructions PDF through the official Ultradent Products website‚ dental professional resources‚ or reliable online dental guides for comprehensive details.

Official Ultradent Products Website

Ultradent Products is the primary and most reliable source for obtaining the official Opalescence 20 Instructions PDF. Navigating to their website provides direct access to the most current and accurate documentation regarding the product’s usage‚ safety guidelines‚ and frequently asked questions;

Typically‚ the PDF can be found within the product section dedicated to Opalescence whitening systems. Look for a dedicated “Resources” or “Downloads” area where instruction manuals‚ safety data sheets (SDS)‚ and other supporting materials are readily available for download.

The website often categorizes resources by product version (e.g.‚ Opalescence 20‚ Opalescence 35)‚ ensuring you locate the correct instructions for your specific whitening gel. Downloading directly from Ultradent guarantees authenticity and minimizes the risk of accessing outdated or inaccurate information found on third-party websites.

Dental Professional Resources

Dental professionals often have access to exclusive resources regarding Opalescence 20‚ including the Instructions PDF‚ through dedicated portals and platforms designed for dental practitioners. These resources are frequently provided by dental supply companies that partner with Ultradent‚ offering convenient access for registered dental offices.

Many dental continuing education websites and online learning modules incorporate the Opalescence system‚ often including downloadable PDFs of the instructions as part of their course materials. Professional dental associations may also provide members with access to product information and guidelines.

Furthermore‚ direct contact with Ultradent’s professional support team can yield access to the latest Opalescence 20 Instructions PDF and address any specific questions or concerns related to the product’s application and safety protocols.

Reliable Online Dental Guides

Several reputable online dental guides and informational websites compile product resources‚ often hosting the Opalescence 20 Instructions PDF for easy access. These platforms frequently curate information from manufacturers and dental professionals‚ ensuring accuracy and relevance for patients and practitioners alike.

Websites dedicated to cosmetic dentistry and teeth whitening procedures often feature detailed guides on using Opalescence‚ including links to download the official instructions. Look for sites with established credibility and a commitment to evidence-based dental information.

However‚ always verify the source and date of the PDF to ensure it reflects the most current guidelines from Ultradent. Cross-referencing information with the official manufacturer’s website is recommended for complete accuracy.

cartisan veil bar instructions

Cartisan Veil Bar Instructions: A Comprehensive Guide

Cartisan’s Veil Bar Pro EVO offers a modern, minimal design, concealing your cartridge while providing variable voltage and USB-C charging capabilities. This guide details setup and operation.

Cartisan introduces the Veil Bar, a sleek and discreet vaping device designed for modern users. This innovative product prioritizes both style and functionality, offering a concealed cartridge experience. The Veil Bar Pro EVO distinguishes itself with its minimalist aesthetic and advanced features, including variable voltage settings and convenient USB-C charging.

It’s engineered to seamlessly integrate into your lifestyle, providing a sophisticated alternative to traditional vaping methods. The device’s magnetic connection simplifies cartridge access, while its 510 thread compatibility ensures versatility. Whether you’re a seasoned vaper or new to the experience, the Veil Bar aims to deliver a refined and enjoyable session.

What is the Veil Bar Pro EVO?

The Veil Bar Pro EVO represents Cartisan’s commitment to innovation in concealable vaping technology. It’s a modern, minimal device meticulously crafted to discreetly house your cartridge, offering a seamless and stylish experience. Beyond aesthetics, the Pro EVO boasts practical enhancements like adjustable voltage control, allowing for personalized vapor production.

Equipped with a USB-C charging port, it ensures quick and efficient power-ups. The device’s design prioritizes ease of use, featuring a magnetic connection for effortless cartridge swaps and broad 510 thread compatibility. It’s more than just a vape; it’s a statement of refined taste and technological advancement.

Key Features and Benefits

The Cartisan Veil Bar Pro EVO delivers a multitude of benefits. Its primary feature is complete cartridge concealment, offering ultimate discretion. Variable voltage settings empower users to customize their vaping experience, tailoring intensity to preference. The inclusion of USB-C charging ensures rapid and convenient power replenishment.

Furthermore, the magnetic connection simplifies cartridge attachment and removal, while 510 thread compatibility broadens cartridge options. Enjoy easy access to your cartridge with the pop-off bottom design. The sleek, modern aesthetic complements its functional advantages, making it a stylish and practical choice.

Unboxing and Component Overview

Upon opening the box, you’ll find the Veil Bar NEO, a USB Type-C charging cable, and a comprehensive user manual for guidance and support.

In the Box Contents

The Cartisan Veil Bar package is thoughtfully curated to ensure a seamless user experience right from the start. Inside, you will discover the core component: the Veil Bar NEO 510 Vape Battery itself, a sleek and discreet device designed for modern use.

To keep your Veil Bar powered up, a USB Type-C Charging Cable is included, offering fast and convenient charging capabilities. This cable is universally compatible with many modern charging adapters.

Finally, and crucially, a detailed User Manual is provided. This manual serves as your comprehensive guide, covering everything from initial setup and operation to troubleshooting and safety precautions. It’s highly recommended to review the manual before first use.

Identifying the Components: Veil Bar, USB-C Cable, Manual

The Veil Bar NEO is the central component – a 510 vape battery with a minimalist design, engineered for discreet cartridge concealment. Examine its magnetic connection point for cartridge attachment. Next, locate the USB Type-C Charging Cable; it features a reversible connector for effortless charging.

Distinguish it from standard USB cables by its smaller size and oval shape. Lastly, the User Manual is a booklet containing vital information. It details setup, operation, safety guidelines, and troubleshooting steps.

Familiarize yourself with the manual’s diagrams and explanations to maximize your Veil Bar experience. These three components work in harmony to deliver a premium vaping experience.

Setting Up Your Veil Bar

Cartisan’s Veil Bar setup is straightforward: access your cartridge easily via the magnetic connection, then simply screw in your preferred cartridge;

Attaching a Cartridge

Attaching a cartridge to your Cartisan Veil Bar is designed for simplicity and convenience. Begin by gently removing the bottom portion of the device; it utilizes a secure yet easily detachable magnetic connection. Once the bottom is removed, you’ll reveal the standard 510 threading. Carefully screw your chosen cartridge into the 510 thread, ensuring it’s snug but not overly tightened to avoid any potential damage to the threading.

The Veil Bar’s design accommodates a wide range of compatible cartridges. After securely attaching the cartridge, simply reattach the magnetic bottom piece. The magnetic connection will snap back into place, completing the setup and concealing your cartridge within the sleek Veil Bar body.

Magnetic Connection Explained

The Cartisan Veil Bar utilizes a robust magnetic connection for the bottom portion of the device, offering both security and ease of use. This design allows for quick access to your cartridge for swapping or maintenance. The magnets are strategically positioned to ensure a firm hold, preventing accidental detachment during normal use.

To remove the bottom, simply apply gentle pressure and twist; it will easily separate from the main body. Reattaching is just as simple – align the bottom piece and it will snap securely into place. This magnetic system eliminates the need for screws or complicated mechanisms, streamlining the cartridge access process and enhancing the overall user experience.

Understanding the 510 Thread Compatibility

The Cartisan Veil Bar is engineered with universal 510 thread compatibility, ensuring it can accommodate a vast majority of oil cartridges available on the market. This industry-standard threading allows for seamless integration with your preferred cartridge, providing flexibility and convenience.

Simply screw your 510-threaded cartridge into the connection point after removing the magnetic bottom cap. Ensure a snug, but not overly tight, fit to maintain a proper seal. The 510 compatibility broadens the Veil Bar’s usability, making it a versatile option for various cartridge types and brands, enhancing the overall vaping experience.

Operating Instructions

Veil Bar Pro EVO features simple operation: power on/off with five clicks, adjust voltage for personalized sessions, and utilize the flow mode for timed fan activation.

Powering On and Off

Veil Bar operation begins with a straightforward power sequence. To activate the device, quickly press the power button – located discreetly on the unit – five times in rapid succession; You’ll notice a subtle indicator, confirming the device is now powered on and ready for use.

Conversely, to power down the Veil Bar and conserve battery life, repeat the same process: five quick presses of the power button. The indicator will signal the device is entering standby mode. This prevents accidental activation while stored and ensures optimal battery performance. Remember, consistent, rapid presses are key to successful operation.

Variable Voltage Settings

The Veil Bar Pro EVO empowers users with customizable experiences through its variable voltage settings. Adjusting the voltage allows you to fine-tune the intensity of your session, catering to individual preferences and cartridge compatibility. Typically, voltage is adjusted by quickly pressing the power button three times.

Each subsequent triple-press cycles through the available voltage levels. A visual indicator, often a change in LED color, confirms the selected setting. Experimenting with different voltages can unlock nuanced flavor profiles and vapor production. Start with lower settings and gradually increase to find your ideal balance.

Flow Mode Functionality and Duration

Cartisan’s Veil Bar Pro EVO features a unique “Flow Mode” designed to enhance your experience. This function typically activates by pressing the power button twice. Flow Mode engages a fan, providing consistent airflow and potentially improving vapor density and flavor.

The duration of Flow Mode varies, but generally runs for a pre-set period, often around 15-30 seconds; The device may indicate Flow Mode activation with a distinct LED pattern. Users can deactivate Flow Mode by pressing the power button twice again. It’s a great feature for those seeking a more dynamic and flavorful session.

Charging Your Veil Bar

Cartisan Veil Bar utilizes a USB-C charging cable for convenient power-up. Pay attention to charging indicators and times for optimal battery life and performance.

Using the USB-C Charging Cable

Cartisan equips the Veil Bar with a modern USB-C charging port, ensuring fast and efficient power replenishment. To charge, simply connect the included USB-C cable to the port located on the device and plug the other end into a compatible USB power source – a wall adapter or computer USB port will work effectively.

Ensure the connection is secure for optimal charging. While charging, the device may exhibit a visual indicator, such as a light, to confirm power is being received. Using a high-quality USB-C cable and power adapter is recommended for the best charging experience and to avoid potential compatibility issues. Avoid using damaged cables or adapters.

Charging Indicators and Times

The Cartisan Veil Bar utilizes visual cues to indicate its charging status. Typically, a light will illuminate while the device is actively charging, often displaying a specific color – such as red or amber – to signify charging in progress. Once fully charged, the indicator light usually changes to green, or may turn off completely.

Charging times can vary depending on the power output of your USB charger. Generally, a full charge from a depleted battery takes approximately 60-90 minutes. It’s best to avoid using the device while it’s charging to ensure optimal charging efficiency and prolong battery lifespan. Monitor the indicator light for accurate status updates.

Maintenance and Care

Cartisan Veil Bar requires regular cleaning and careful handling. Avoid water contact with electronic components, and consult the user manual for troubleshooting.

Cleaning the Device

Maintaining your Cartisan Veil Bar’s performance requires periodic cleaning. Begin by ensuring the device is powered off and disconnected from any power source. Gently wipe the exterior surfaces with a soft, dry cloth to remove any dust or debris. For more stubborn residue, lightly dampen the cloth with isopropyl alcohol – avoiding any openings or the 510 connection point.

Never submerge the Veil Bar in liquid, as this can cause irreversible damage to the internal electronic components. Pay particular attention to the magnetic connection area, ensuring it remains free of any obstructions that could interfere with cartridge attachment. Regular, gentle cleaning will help prolong the life and optimal functionality of your Cartisan device.

Avoiding Water Contact with Electronic Components

Protecting the internal electronics of your Cartisan Veil Bar from water damage is crucial for its longevity. The device is not waterproof, and exposure to liquids can lead to malfunction or permanent failure. Avoid using the Veil Bar in humid environments, such as bathrooms during showers, or near open water sources.

If the device does come into contact with moisture, immediately power it off and thoroughly dry the exterior with a soft cloth. Do not attempt to charge or operate the device until you are certain it is completely dry. Remember, liquid ingress voids any warranty, so preventative measures are essential for maintaining optimal performance.

Troubleshooting Common Issues

If issues arise, consult the user manual for guidance. Connectivity problems or battery concerns can often be resolved with simple troubleshooting steps.

Referencing the User Manual

The included user manual is your primary resource for resolving any operational questions or concerns regarding your Cartisan Veil Bar. It contains detailed diagrams illustrating component identification, setup procedures, and comprehensive operating instructions. Before seeking further assistance, carefully review the manual’s troubleshooting section.

This section addresses common issues like connectivity problems, charging difficulties, and unexpected device behavior. The manual also outlines safety precautions, proper cartridge selection guidelines, and responsible usage recommendations. Familiarizing yourself with the manual ensures optimal performance and longevity of your Veil Bar Pro EVO, maximizing your overall experience.

Addressing Connectivity Problems

If you experience issues with your Cartisan Veil Bar, begin by ensuring the cartridge is securely connected via the 510 thread. Confirm a clean connection, free from debris or residue. Inspect the cartridge’s 510 pin for any damage or bending, as this can interrupt conductivity.

Try gently tightening or loosening the cartridge to find an optimal connection point. If problems persist, consult the user manual for specific troubleshooting steps. A faulty cartridge could also be the source of the issue; testing with a known working cartridge can help isolate the problem.

Battery Life Concerns and Solutions

If you’re noticing shorter battery life with your Cartisan Veil Bar, several factors could be at play. Higher voltage settings consume more power, reducing overall usage time. Frequent use of Flow Mode, which activates the fan, also impacts battery performance.

Ensure you’re fully charging the device using the provided USB-C cable. Avoid leaving the device plugged in for extended periods after reaching a full charge, as this can degrade battery health. If battery life remains significantly reduced, consult the user manual for further assistance or contact Cartisan support.

Safety Precautions

Always select appropriate cartridges and avoid overcharging the Veil Bar. Responsible usage is key; follow all guidelines for a safe and enjoyable experience.

Proper Cartridge Selection

Choosing the right cartridge is crucial for optimal performance and safety with your Cartisan Veil Bar. Ensure the cartridge you select is compatible with a 510 thread connection, as the Veil Bar is designed for this standard. Prioritize cartridges from reputable sources to guarantee quality and avoid potential issues with leaks or malfunctions.

Inspect cartridges carefully before attachment; damaged or faulty cartridges should not be used. Consider the oil viscosity and concentration of the cartridge, as these factors can influence the vaping experience. Always adhere to local regulations regarding cartridge contents and usage. Using incompatible or low-quality cartridges may void your Veil Bar’s warranty and could pose a safety risk.

Avoiding Overcharging

To maximize the lifespan and safety of your Cartisan Veil Bar’s battery, avoid overcharging. Once fully charged, disconnect the USB-C cable promptly. Leaving the device connected for extended periods after reaching full charge can degrade the battery’s performance over time and potentially create a safety hazard.

Monitor the charging indicators; discontinue charging when the indicator signals completion. While the Veil Bar incorporates safety mechanisms, consistent overcharging should be prevented. Do not use fast chargers or high-voltage power adapters, as these can damage the internal circuitry. Responsible charging practices ensure long-term reliability and user safety.

Responsible Usage Guidelines

Ensure proper cartridge selection, using only compatible and high-quality cartridges with your Cartisan Veil Bar. Avoid using damaged or leaking cartridges. Operate the device in a well-ventilated area and keep it away from flammable materials. Do not disassemble or attempt to repair the device yourself; contact Cartisan support for assistance.

Store the Veil Bar in a safe, dry place, away from extreme temperatures and direct sunlight. Keep out of reach of children and pets. Use the device responsibly and in accordance with all applicable laws and regulations. Prioritize safety and mindful consumption.

Advanced Features (If Applicable)

The Veil Bar Pro EVO may support potential firmware updates for enhanced functionality and customization options, improving the user experience over time.

Customization Options

The Veil Bar Pro EVO distinguishes itself with variable voltage settings, allowing users to tailor their experience to their preferred intensity. Experimenting with these settings can significantly alter the flavor profile and vapor production of your chosen cartridge. While specific customization beyond voltage adjustment isn’t explicitly detailed, the potential for firmware updates – as hinted at by Cartisan – suggests future possibilities.

These updates could introduce features like personalized heating curves or adjustable flow mode durations. Currently, users can customize their session by selecting the optimal voltage for their cartridge and utilizing the flow mode for controlled airflow. Keep an eye on Cartisan’s official channels for announcements regarding new features and software enhancements.

Potential Firmware Updates

Cartisan hasn’t released detailed information regarding firmware updates for the Veil Bar Pro EVO, but the possibility exists to enhance device functionality. Future updates could introduce expanded customization options, such as personalized heating profiles tailored to specific cartridge types. Improved flow mode control, allowing users to adjust duration and intensity, is another potential enhancement.

Checking Cartisan’s official website and social media channels is crucial for update announcements and instructions. Firmware updates, when available, will likely be delivered via a USB-C connection to a computer. Regularly checking for updates ensures your Veil Bar operates with the latest features and optimal performance.