
Ryobi Lawn Mower Manual: A Comprehensive Guide
Navigating Ryobi press maintenance, from dampening systems to registration issues, highlights a need for skilled technicians and precise adjustments for optimal performance.
Ryobi offers a diverse range of lawn mowers, mirroring the complexity seen in their printing press technology – requiring specialized knowledge for upkeep. From basic push mowers to advanced self-propelled and robotic models, Ryobi prioritizes user-friendly operation and reliable performance. Like maintaining a Ryobi press’s registration, consistent lawn care demands attention to detail. This manual provides comprehensive guidance, ensuring your Ryobi mower delivers a pristine cut, season after season, much like a perfectly printed sheet.

Understanding Your Ryobi Model
Just as identifying a specific Ryobi press model is crucial for parts and service – like the 524GE or 3302 – knowing your lawn mower’s details is essential. Locate the model and serial number on the mower’s deck. This information unlocks access to specific manuals, parts diagrams, and troubleshooting advice. Ryobi mowers vary significantly in features and capabilities, demanding tailored maintenance approaches for peak performance.
Identifying Your Specific Ryobi Mower
Similar to pinpointing a Ryobi press like the 3302M for accurate servicing, precisely identifying your lawn mower model is paramount. The model number is typically found on a sticker located on the mower deck, often near the battery compartment or operator controls. Record this number; it’s key for accessing the correct manual, replacement parts, and support resources tailored to your specific Ryobi mower.
Ryobi Mower Series Overview (e.g., 40V, 18V)
Ryobi lawn mowers are broadly categorized by voltage, much like understanding the intricacies of a Ryobi press’s systems. Common series include the 40V, offering robust power and runtime, and the 18V, providing convenience and portability. Each voltage family utilizes compatible batteries and chargers, but performance varies. Knowing your series dictates battery selection and available features, ensuring optimal mowing efficiency.
Safety Precautions
Prioritizing safety is paramount, mirroring the careful adjustments needed for a Ryobi press’s registration. Always disconnect the battery before maintenance. Wear appropriate safety glasses and footwear. Never operate the mower without all guards in place. Keep children and pets clear of the mowing area. Be mindful of potential projectiles and avoid steep slopes.
General Safety Rules
Like maintaining a Ryobi press’s delicate form roller train, careful operation is key. Read the entire manual before use. Never operate while under the influence of drugs or alcohol. Inspect the lawn for debris before mowing. Avoid operating in wet conditions. Ensure firm footing while operating. Never attempt to repair the mower yourself if unqualified.
Pre-Operation Safety Checks
Similar to checking a Ryobi press’s plate and oscillator striping, pre-operation checks are vital. Verify all guards and shields are securely in place. Inspect the grass catcher or mulch plug for damage. Check the oil and fuel levels (if applicable). Ensure the blade is sharp and securely attached. Clear the mowing area of obstacles and people before starting.
Assembly and Initial Setup
Much like assembling a Ryobi press, careful setup is crucial. Unpack all components and verify against the parts list. Attach the handle, ensuring secure locking mechanisms. Install wheels, confirming proper alignment for smooth operation. Connect the grass bag or mulch plug, ensuring a tight fit to prevent discharge issues. Double-check all connections before initial use.

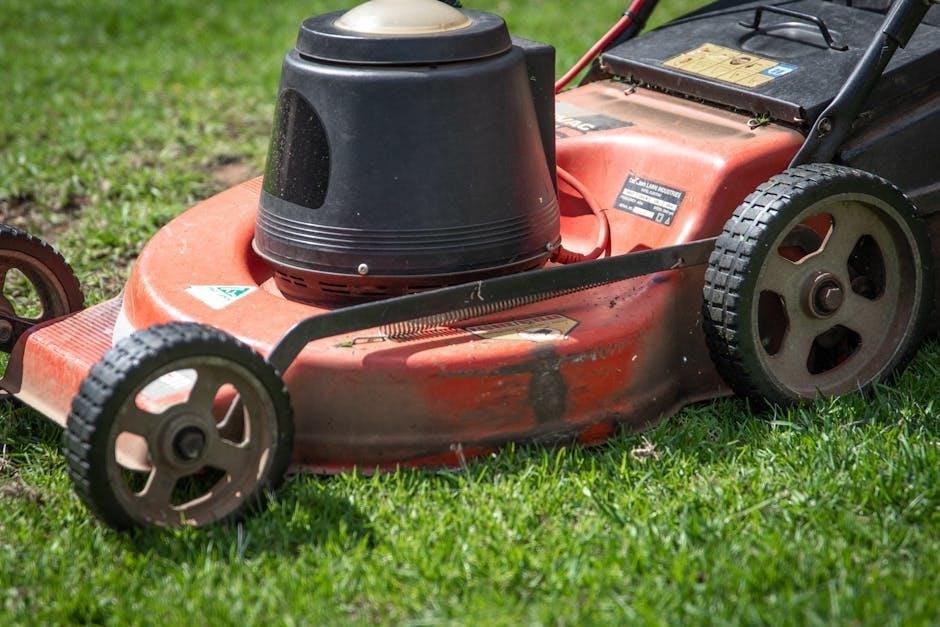
Unboxing and Component Identification
Similar to receiving a Ryobi press, careful inventory is key. Upon unboxing, identify all components: the mower deck, handle, wheels, bag or mulch plug, and any included hardware. Compare these against the parts diagram in the manual. Note any shipping damage immediately. Proper identification prevents assembly errors and ensures a smooth setup process.
Handle and Wheel Installation
Echoing the precision needed for press components, securely attach the handle to the mower deck using the provided bolts and washers. Ensure proper alignment for comfortable operation. Next, install the wheels, verifying they are firmly connected and spin freely. Tighten all fasteners to the manufacturer’s specifications – similar to a Ryobi press’s adjustments – for safe and stable mowing.
Bag or Mulch Plug Attachment
Like ensuring correct plate striping on a Ryobi press, proper attachment is crucial. To install the grass collection bag, align the bag frame with the mower deck’s receiver and snap it securely into place. Alternatively, for mulching, insert the mulch plug into the discharge chute opening. Confirm a snug fit to prevent clippings from escaping – mirroring the need for registration hold.
Operating Instructions
Similar to a Ryobi press requiring precise settings, successful operation demands attention to detail. Before starting, ensure the mower deck is clear. Engage the blade via the safety bail and, for electric models, insert the battery. Adjust speed as needed, remembering consistent passes yield the best results – much like maintaining registration on a print run.
Starting the Lawn Mower
Echoing the careful setup of a Ryobi press, beginning requires specific steps. For cordless models, verify a fully charged battery is inserted. Engage the safety key (if equipped) and firmly hold the bail handle against the mower. Press the power button; the blade should engage swiftly. Release the bail to immediately stop the blade – a crucial safety feature.

Adjusting Cutting Height
Similar to precise plate adjustments on a Ryobi press, achieving the desired cut necessitates understanding your mower’s height adjustment system. Most Ryobi mowers feature single-lever or individual wheel adjustments. Locate the levers and select your preferred height setting, ensuring all wheels are at the same level for an even cut.
Mowing Techniques for Optimal Results
Just as consistent inking is crucial on a Ryobi press, overlapping each mowing pass slightly—around 2-3 inches—prevents scalping and ensures a uniform cut. Vary your mowing pattern with each use to avoid soil compaction and promote healthy grass growth. Maintain a steady walking pace for consistent results.
Maintenance Schedule
Similar to the regular adjustments needed for a Ryobi press’s dampening system, consistent lawn mower maintenance is vital. Inspect the blade monthly for sharpness and damage, sharpening or replacing as needed. Check and clean the mower deck after each use. An annual deep clean and lubrication will extend its lifespan.
Regular Maintenance Tasks
Echoing the precision required for Ryobi press registration, routine tasks are key. Clean the underside of the deck after every mow to prevent corrosion. Inspect belts for wear, and tighten any loose bolts. Regularly check the air filter and replace it when dirty. Oil changes (if applicable) should occur seasonally, mirroring press component upkeep.
Blade Sharpening and Replacement
Similar to maintaining consistent stripes on a Ryobi press, sharp blades are crucial. Sharpen annually, or more often with heavy use, ensuring balance to avoid vibration. Inspect for cracks or damage; replace immediately if found. Always disconnect the spark plug before blade work, prioritizing safety like press technician protocols.
Troubleshooting Common Issues
Echoing Ryobi press challenges like registration drift, common mower issues include starting problems, uneven cuts, and excessive vibration. Check fuel, spark plug, and air filter for starting issues. Uneven cuts often signal dull blades. Vibration indicates imbalance; inspect and sharpen or replace blades, mirroring press maintenance precision.
Mower Won’t Start
Similar to diagnosing a Ryobi press that fails to feed, a non-starting mower requires systematic checks. First, ensure proper fuel levels and a clean air filter. Inspect the spark plug for fouling or damage, replacing if necessary; Confirm battery charge (for cordless models) and safety interlock engagement.
Uneven Cut
Much like registration issues on a Ryobi press, an uneven cut signals a problem needing attention. Dull or damaged blades are a primary cause; sharpen or replace them. Check the deck level – an imbalanced deck results in scalping. Ensure proper tire inflation for consistent height. Adjust cutting height settings as needed.
Excessive Vibration
Similar to a Ryobi press needing precise adjustments, excessive vibration indicates a potential issue. First, check blade balance – an unbalanced blade causes significant shaking. Inspect the engine mounting bolts; ensure they are tightened securely. Look for any loose parts or debris under the deck. Stop use immediately and investigate thoroughly for safety.
Battery Care (for Cordless Models)
Like maintaining a press’s intricate systems, proper battery care extends your Ryobi mower’s life. Always use the Ryobi-supplied charger. Avoid extreme temperatures during charging and storage. Store batteries partially charged for long periods. Regularly clean battery terminals to ensure optimal connection and performance, maximizing runtime and overall battery health.

Charging Procedures
Similar to ensuring consistent ink flow in a press, always charge Ryobi batteries in a cool, dry location. Use only the designated Ryobi charger. A full charge typically takes several hours; avoid interrupting the cycle. The charger’s indicator lights signal completion. Never overcharge, as this can reduce battery lifespan and potentially cause damage.

Battery Storage Guidelines
Just as proper plate storage prevents damage, store Ryobi batteries in a cool, dry place, away from direct sunlight and extreme temperatures. Ideally, maintain a partial charge (around 40-60%) for long-term storage. Avoid fully discharging before storage. Regularly check battery voltage and recharge if needed to prevent deep discharge, mirroring press maintenance routines.
Extending Battery Life
Similar to maintaining consistent press registration, optimize battery life by avoiding complete discharges and overcharging. Use the correct Ryobi charger and follow recommended charging times. Store batteries properly when not in use, maintaining a partial charge. Consistent, mindful usage, like careful press operation, maximizes longevity and performance.
Cleaning and Storage
Just as diligent press cleaning prevents ink buildup, thoroughly clean your Ryobi mower after each use, removing grass clippings from the deck and blade. For long-term storage, stabilize fuel (if applicable) and disconnect the battery. Store in a dry location, protecting it from the elements, mirroring careful press preservation.
Post-Mowing Cleaning
Similar to clearing press rollers after a run, immediately after mowing, disconnect the spark plug wire for safety. Scrape away accumulated grass from the mower deck using a scraper or brush. Inspect and clean the underside, removing any clinging debris. This prevents corrosion and ensures optimal performance for the next use.
Long-Term Storage Preparation
Echoing press maintenance for extended downtime, before storing, stabilize the fuel or drain it completely to prevent gumming. Remove the battery and store it in a cool, dry place. Clean the mower thoroughly and apply a light coat of oil to metal parts, guarding against rust. Store in a sheltered location.
Parts Diagram and Replacement
Similar to sourcing Ryobi press components, detailed parts diagrams are crucial for identifying specific mower parts. Ryobi’s website offers downloadable diagrams for various models. Replacement parts can be ordered online through authorized Ryobi dealers or directly from Ryobi’s parts department, ensuring compatibility and maintaining mower performance.
Locating Parts Diagrams
Echoing the need for press schematics, Ryobi lawn mower parts diagrams are readily accessible. Begin by visiting the official Ryobi website and navigating to the support section. Enter your specific mower model number to filter results. Downloadable PDFs detail exploded views, identifying each component with a corresponding part number for easy ordering.
Ordering Replacement Parts
Similar to sourcing press components, obtaining Ryobi mower parts is straightforward. Utilize the part numbers identified in the diagrams. Ryobi’s website offers direct online ordering, or you can visit authorized Ryobi retailers – both physical stores and online vendors. Third-party parts suppliers also exist, but verify compatibility before purchasing to ensure a proper fit and function.
Understanding the Ryobi Warranty
Like press warranties, Ryobi lawn mower warranties vary by model and purchase date. Generally, they cover defects in materials and workmanship for a specified period. Review your purchase documentation for exact terms, including what’s covered and excluded. Proper maintenance, as outlined in this manual, is crucial for warranty validity. Keep records of all service and repairs.
Warranty Coverage Details
Mirroring press component warranties, Ryobi lawn mower coverage typically includes defects arising from normal use; It often excludes wear items like blades, belts, and spark plugs. Damage from misuse, accidents, or unauthorized repairs voids the warranty. Specific durations differ – some parts may have shorter coverage periods than the main unit.
Making a Warranty Claim
Similar to press repair processes, initiating a Ryobi lawn mower warranty claim requires proof of purchase and a detailed description of the defect. Contact Ryobi customer service or an authorized service center. They may request photos or require the mower to be inspected. Retain all documentation related to the claim for tracking purposes.
Ryobi Mower Specific Features
Echoing the complexities of press configurations, Ryobi mowers boast diverse features. Self-propelled drive systems enhance maneuverability, while mulching capabilities return nutrients to the lawn. Bagging systems offer convenient debris collection. Understanding these features—akin to mastering a press’s inking or dampening—is crucial for efficient operation and optimal results.
Self-Propelled Drive System (if applicable)
Similar to a press’s intricate roller train, the self-propelled system simplifies mowing on inclines or uneven terrain. Engage the drive control for assisted movement; adjust speed settings for comfort and efficiency. Regular inspection of drive components—belts, gears—ensures smooth operation, mirroring the need for precise press adjustments to maintain registration and quality.
Mulching Capabilities
Like applying a stripe to a plate, Ryobi mowers offer mulching options, finely chopping grass clippings and returning them to the lawn as fertilizer. Utilize the mulch plug for this feature, ensuring proper blade sharpness for effective breakdown. This process, akin to press adjustments, requires precision for optimal results and a healthy, vibrant lawn.
Bagging System Details
Similar to a press’s delivery system, Ryobi mowers feature a rear-bagging system for collecting grass clippings. Ensure the bag is securely attached before operation to prevent spillage. Regularly empty the bag to maintain mowing efficiency and prevent clogging, much like clearing debris from a printing press. Proper bag attachment is crucial.
Advanced Features and Settings
Reflecting press control systems, some Ryobi mowers offer variable speed control, allowing adjustment for varying grass conditions – akin to adjusting press speed for different stock. Single-lever height adjustment provides quick and easy cutting height changes, mirroring the streamlined adjustments found on modern printing machinery. These features enhance user control.
Variable Speed Control (if applicable)
Similar to press speed adjustments, variable speed control on select Ryobi mowers allows operators to match the blade speed to grass thickness and terrain. Slower speeds tackle dense growth, while faster speeds efficiently cut lighter lawns. This optimizes battery life and cut quality, providing a versatile mowing experience akin to press run optimization.
Single-Lever Height Adjustment
Echoing the quick make-ready features of a Ryobi press, single-lever height adjustment simplifies changing the cutting height across all four wheels simultaneously. This intuitive design eliminates individual wheel adjustments, saving time and ensuring a consistently level cut. It’s a streamlined process, much like setting registration on a press, for efficient operation.
Ryobi Support and Resources
Similar to seeking a skilled Ryobi press technician, owners can find extensive support through the official Ryobi website, accessing digital manuals and FAQs. For personalized assistance, customer service contact information is readily available. Troubleshooting guides, mirroring press repair resources, empower users to resolve common issues independently, ensuring continued optimal performance.
Ryobi Website and Online Manuals
Just as detailed press manuals are crucial, Ryobi’s website provides a comprehensive library of online resources. Users can download digital versions of their specific lawn mower manual, alongside helpful guides and troubleshooting tips. This digital accessibility mirrors the need for readily available press documentation, ensuring convenient self-service support and quick issue resolution.

Customer Service Contact Information
Similar to seeking a skilled Ryobi press technician when facing complex issues, direct access to Ryobi’s customer service is vital. Contact options include a dedicated phone line, email support, and often, a live chat feature on their website. Prompt assistance ensures quick solutions, mirroring the urgency of press repairs to minimize downtime and maintain operational efficiency.
Frequently Asked Questions (FAQ)
Echoing the common queries about Ryobi press components like oscillator striping, users frequently ask about blade sharpening, starting issues, and uneven cutting. Troubleshooting guides address registration problems and vibration concerns. Understanding these FAQs, much like diagnosing a press malfunction, empowers owners to resolve issues independently and optimize performance.
Common User Queries
Similar to questions regarding Ryobi press registration drift, users often inquire about mower starting failures and achieving consistent cut quality. Concerns about excessive vibration, mirroring press component adjustments, are frequent. Queries also include proper blade maintenance, echoing the need for skilled technicians, and understanding complex systems like dampening controls.
Environmental Considerations
Reflecting responsible pressroom practices, proper disposal of mower batteries and worn parts is crucial. Like managing printing chemicals, minimizing environmental impact requires adherence to local regulations. Consider recycling options for both batteries and metal components. Sustainable practices, mirroring press maintenance, extend product lifespan and reduce landfill waste, promoting ecological responsibility.
Responsible Disposal of Batteries and Parts
Echoing press component lifecycle management, depleted Ryobi mower batteries should never be discarded with regular waste. Utilize designated battery recycling centers – mirroring responsible ink/chemical disposal. Metal parts can often be recycled as scrap. Check local waste management guidelines for compliant disposal methods, minimizing environmental harm and promoting sustainability, just like press upkeep.